Programming a Tesla

I have a friend called Chris who is a big fan of the band China Drum. Many years ago he challenged me to program their song Last Chance as a custom ringtone on his Nokia phone and, being vaguely musical, I obliged.

Time has moved on since then. With his hitherto rock-star hair cut to a respectable length, he is now the CEO of a company providing disease model human cells. And he owns a Tesla, something he likes to remind me about from time to time. Now it turns out that one of the silly things you can do with a Tesla is program the lights to flash to make a custom light show for a piece of music of your choice. You can probably see where this is heading.

Since a) I was going up to meet him (and his Tesla) in Yorkshire last weekend and b) I wasn’t sure how long the “I’ve been busy” excuse would work in response to the “Where’s my light show?” question, I figured I’d probably better actually try to do the damn thing.

Problem 1 – I don’t have the song

Sadly I didn’t have a copy of China Drum’s Goosefair album, so I didn’t have the audio. But I do have Linux, and a Spotify subscription, and the command-line ncspot client. I reasoned that if I could play the audio, I could surely also record the audio, it just might mean losing the will to live while trying to understand how Pulseaudio works (or maybe it’s PipeWire now, or who knows?)

Cutting a long and tedious story short, by doing some mystical fiddling about, I was able to send the output of ncspot to Audacity and thereby record myself a WAV of the song. In the interests of remaining on the right side of the law, I made good faith attempts to locate an original copy of the album, but it seems to be out of print. So I now have a copy via eBay.

Problem 2 – I don’t have the application for building the light show

To build a light show, one needs an open-source application called xLights. Since this doesn’t appear to be in the Ubuntu package repository, I had to build it from source. For some reason, I’m a bit averse to installing random libraries and things on my machine, but fortunately there is a “build it in Docker” option which I used and seemed to work successfully, except that I couldn’t figure out how to get at the final built application! It existed as a file in the filesystem of the docker container, but since the executing script had finished, the container wasn’t running, and there seemed to be no obvious way to get at it (it is entirely possible that I was just being stupid, of course). In the end, I reasoned that any file on a container filesystem has to be in my /var/lib directory somewhere, and with a bit of poking around, I located the xLights-2023.08-x86_64.AppImage file and copied it somewhere sensible.

Problem 3 – I don’t know where the beats are

I followed various instructions and got myself set up with a working application, a fresh musical sequence project for the file, and the .wav imported and displaying as a waveform.

The way xLights works is that you start with a bunch of horizontal lines representing available lights, you set up a bunch of timing markers which present as vertical lines thus dividing the work area up into a grid, and you can create light events in various cells of the resulting grid and the start / stop transitions of each light are aligned with the timing markers (though they can subsequently be moved). Thus you need a way of creating these markers. Fortunately, it is possible to download an audio plugin to figure these out for you. After doing this, you end up with a screen looking something like this:

An empty xLights grid.

Problem 4 – I can’t copy and paste

So I started filling things in with the idea that if I got something that I was happy with for a couple of bars, I could copy and paste it elsewhere rather than having to enter every note manually. Unfortunately, I ran into an unexpected problem, which is that the timing on the track is very variable. For example, I picked a couple of channels and used one to show where the “1” beats were in each bar and put lights on “2”, “3” and “4” in the other. But if you then try to copy and paste this bar into two bars, then four, then eight and so on, you quickly get out of sync with the beat lines, because the band speed up as the song goes on. Also, I couldn’t see any obvious option in xLights to quantise a track (i.e. to adjust the starts and ends of notes to match a set of timing marks).

Fortunately, the format that xLights uses to save these sequences is XML-based. Therefore I was able to write a Scala application to read in the sequence, make a note of all of the timestamps corresponding to the timing marks, and then shuffle all starts and ends of notes to the nearest timestamp. Actually, originally I wrote a thing to try to regularise the timestamp markers (i.e. keep the same number of them but make the spacing uniform) and quickly realised that the resulting markers were woefully out of sync with the music, which is when I realised the tempo of the song was variable.

Problem 5 – I can’t count

I dimly remembered from the Tesla light-show instructions that there was a limit of 3500 lights in a show, so I had to make sure the total number didn’t go above that. I couldn’t see an obvious way to do this in xLights, but I could see that it was just a question of running a suitable XPath expression against the XML file. So I fired up oXygen and wrote one (the correct XPath – see below – is count(//Effect[not(parent::EffectLayer/parent::Element[@type='timing'])]))

And so my development cycle was basically:

  • Stare at lots of blobs on the grid, adding and removing them and generally twiddle until it seems satisfactory
  • Run the Scala application to quantise it all to the timing marks, thus dealing with any slight mismatches caused by copying-and-pasting
  • Check in oXygen how many lights I’ve used (editing the raw XML was also useful to copy between channels e.g. to make the rear left turn indicators do the same as the front left turns)

Problem 6 – I can’t read instructions

Having got something I was reasonably happy with, I double-checked the instructions. Oh no! I am an idiot! It doesn’t say 3500 lights, it says 3500 commands where a command is “turn light on” or “turn light off”. So I now have twice the number of allowed lights, and drastic editing would be needed (naturally, this was the Friday night before I was due to drive up with it, after a number of late nights working on it).

Fortunately, I had also been an idiot (very slightly) with my counting XPath; because of the way the XML format works, each timing mark was being counted as an event. So having tweaked it not to count the timing marks, I had around 2600 lights, which is rather more than the 1750 budget but less bad than the 3400ish I started with.

So I had to scale things back a bit. I dropped the tracks I’d been using for the “1 2 3 4” beat. I removed some of the doubling up between channels. I dropped some of the shorter notes in tracks where I’d been trying to reproduce the rhythm of the vocals. I simplified bits and generally chopped it about until I had something that met the requirements.

Part of the finished product

Problem 7 – I don’t have a USB stick

Well, I didn’t at the start of the project. I did by the end; the smallest one I could find in Curry’s was 32GB. Which is ridiculous overkill for the size of the files needed (the audio was 27M, the compiled lightshow file was 372K). But, well, whatever…

And that was it. I followed the instructions about what needed to be on the stick (a folder called “LightShow” with that exact capitalisation containing “lightshow.wav” and “lightshow.fseq”) and took it with me to Yorkshire. Chris plugged it into the Tesla. It ran successfully. Hooray!

I’m not sure there’s a great moral to this story (other than maybe “read the instructions carefully”) but it was a fun challenge. Thanks to China Drum for a great song, Tesla for building the light show feature, and the xLights authors for an open-source application that made building the light show possible.

How we do centralized logging at 67 Bricks

If you’ve had a look around 67 Bricks website, you probably know that we work with quite a few clients. For most of the clients we host their infrastructure, which makes it easier for us to manage it and troubleshoot any issues when they occur. Each client’s infrastructure resides in its own AWS account, which is a part of AWS Organizations. We also have a logging AWS account which is used for infrastructure resources used by client accounts. In this shared account we have set up an ELK stack to collect logs from multiple clients in one place. In this post I will explain how it is set up.

What is ELK?

ELK stands for ElasticSearch, Logstash and Kibana.

A note: in this post I’m going to mention Amazon OpenSearch Service. In the past was called Amazon ElasticSearch Service. Amazon OpenSearch Service uses a fork of older version of ElasticSearch and Kibana. The name ELK, however, seems to have stuck even if OpenSearch is used instead of ElasticSearch (and ELK sounds nicer than OLK, in my opinion).

What is the infrastructure like?

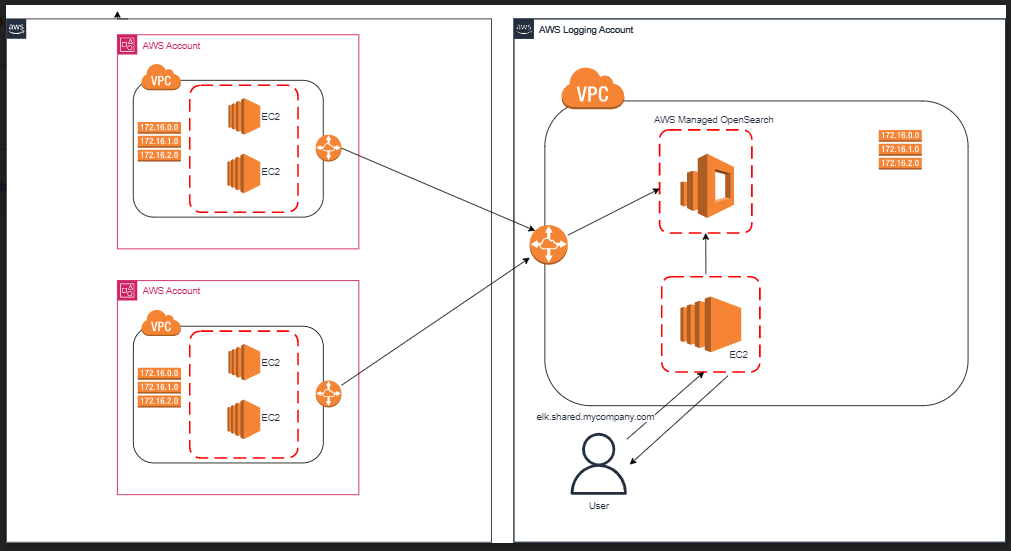
The main elements are AWS Managed OpenSearch instance and an EC2 reverse proxy, which directs requests to OpenSearch. In terms of networking we have VPC peering connections between the VPC of the logging account, where OpenSearch instance resides, and the client account VPCs.

To clarify the above diagram:

Applications send log entries via peering connections. In order for them to be able to do that, the following is required:

1) The security group attached to the servers or containers running the applications must have a rule that allows traffic on port 443 from the CIDR block of the logging account VPC

2) The route table of the VPC in the client accounts must have a route with the logging account VPC CIDR as destination and peering connection as target

3) The security group attached to the OpenSearch instance must allow traffic on port 443 from CIDR ranges of client account VPCs

4) The route table of the VPC in the logging account must have routes with the client account VPC CIDRs are destination and peering connection as target

How do the applications send logs to the ELK instance?

Most applications that send logs are Scala Play applications – they use Logback framework for logging, and the logback.xml file with configuration. We have an appender section for ELK logs – we add it to all applications that send their logs to ELK, thereby ensuring that log entries are the same regardless of the system and have the same fields:

 <appender name="ELK" class="com.internetitem.logback.elasticsearch.ElasticsearchAppender">
    <url>${elkEndpoint}/_bulk</url>
    <!-- This nested %replace expression takes the first letter of the level and maps D and T
    (for DEBUG and TRACE) to d and maps other levels to i -->
    <index>someClient-${environment}-someApp-logs-%replace(%replace(%.-1level){'[DT]', 'd'}){'[A-Z]', 'i'}-%date{yyyy-MM-dd}</index>
    <type>log</type>
    <loggerName>es-logger</loggerName>
    <errorsToStderr>false</errorsToStderr>
    <includeMdc>true</includeMdc>
    <maxMessageSize>4096</maxMessageSize>
    <properties>
      <property>
        <name>client</name>
        <value>iclr</value>
      </property>
      <property>
        <name>service</name>
        <value>ingestion</value>
      </property>
      <property>
        <name>host</name>
        <value>${HOSTNAME}</value>
        <allowEmpty>false</allowEmpty>
      </property>
      <property>
        <name>severity</name>
        <value>%level</value>
      </property>
      ...
  </appender>

Here, environment, elkEndpoint and HOSTNAME are environment variables. environment and elkEndpoint are injected in the EC2 launch template and are populated when the instances are being started.

YOu can also see the <index> element. This will create a new index every day. Before we start sending application logs to ELK, we create an index pattern for each application. An index pattern allows you to select data and can include one or more indices. For example, if we have an index pattern someClient-live-someApp-logs-d-*, it would include indices someClient-live-someApp-logs-d-2023-02-27 , someClient-live-someApp-logs-d-2023-03-13, someClient-live-someApp-logs-d-2023-03-14 and so on.

How do you know if there is a problem with logs?

We have monitors set up in Kibana which check that there are logs coming in. This check is run every 10 minutes on each index pattern, and if it doesn’t find any log entries, it sends an alert to an SNS topic which in turn sends an email to inform us that there is a problem. The configuration of alarms and monitors can be done from the OpenSearch Plugins menu of Kibana.

At the moment these monitors are created manually for each index pattern, which is not ideal because it does take a bit of time setting them up; therefore one of the tasks on our to-do list is to automate monitor creation.

How do you make sure that the OpenSearch instance always has enough space?

When each new index pattern is created, we apply a lifecycle policy to it. For example, we delete info logs after a week; when the index agent is 7 days old, it starts to transition into the Delete state. We also have a Cloudwatch alarm which monitors FreeStorageSpace metric in the AWS/ES namespace.

How do YOU centralize logs from multiple systems on AWS? 🙂

Setting up local AWS environment using Localstack

When Cloud services are used in an application, it might be tricky to mock them during local development. Some approaches include: 1) doing nothing thus letting your application fail when it makes a call to a Cloud service; 2) creating sets of fake data to return from calls to AWS S3, for example; 3) using an account in the Cloud for development purposes. A nice in-between solution is using Localstack, a Cloud service emulator. Whereas the number of services available and the functionality might be a bit limited compared to the real AWS environment, it works rather well for our team.

This article will describe how to set it up for local development in Docker.

Docker-compose setup:

In the services section of our docker-compose.yml we have Localstack container definition:

localstack:
    image: localstack/localstack:latest
    hostname: localstack
    environment:
      - SERVICES=s3,sqs
      - HOSTNAME_EXTERNAL=localstack
      - DATA_DIR=/tmp/localstack/data
      - DEBUG=1
      - AWS_ACCESS_KEY_ID=test
      - AWS_SECRET_ACCESS_KEY=test
      - AWS_DEFAULT_REGION=eu-central-1
    ports:
      - "4566:4566"
    volumes:
      - localstack-data:/tmp/localstack:rw
      - ./create_localstack_resources.sh:/docker-entrypoint-initaws.d/create_localstack_resources.sh

Although we don’t need to connect to any AWS account, we do need dummy AWS variables (with any value). We specify which services we want to run using Localstack – in this case it’s SQS and S3.

We also need to set HOSTNAME_EXTERNAL because SQS API needs the container to be aware of the hostname that it can be accessed on.

Another point is that that we cannot use the entrypoint definition because Localstack has a directory docker-entrypoint-initaws.d from where shell scripts are run when the container starts up. That’s why we’re mapping the container volume to a folder wherer those scripts are. In our case create_localstack_resources.sh will create all the necessary S3 buckets and the SQS queue:

EXPECTED_BUCKETS=("bucket1" "bucket2" "bucket3")
EXISTING_BUCKETS=$(aws --endpoint-url=http://localhost:4566 s3 ls --output text)

echo "creating buckets"
for BUCKET in "${EXPECTED_BUCKETS[@]}"
do
  echo $BUCKET
  if [[ $EXISTING_BUCKETS != *"$BUCKET"* ]]; then
    aws --endpoint-url=http://localhost:4566 s3 mb s3://$BUCKET
  fi
done

echo "creating queue"
if [[ $EXISTING_QUEUE != *"$EXPECTED_QUEUE"* ]]; then
    aws --endpoint-url=http://localhost:4566 sqs create-queue --queue-name my-queue\
    --attributes '{
      "RedrivePolicy": "{\"deadLetterTargetArn\":\"arn:aws:sqs:eu-central-1:000000000000:my-dead-letter-queue\",\"maxReceiveCount\":\"3\"}",
      "VisibilityTimeout": "120"
    }'
fi

Note that AWS CLI command syntax is different to the real AWS CLI (otherwise you’d create resources in the account for which you have the credentials set up!), and includes Localstack endoint flag: –endpoint-url=http://localhost:4566

Configuration files

We use Scala with Play framework for this particular application, and therefore have .conf files. In local.conf file we have the following:

aws { localstack.endpoint="http://localstack:4566" region = "eu-central-1" s3.bucket1 = "bucket1" s3.bucket2 = "bucket2" sqs.my_queue = "my-queue" sqs.queue_enabled = true }

The real application.conf file has resource names injected at the instance startup. They live in an autoscaling group launch template where they are created by Terraform (out of scope of this post).

Initializing SQS client based on the environment

The example here is for creating an SQS client. Below are snippets most relevant to the topic.

In order to initialize the SQS Service so that it can be injected into other services we can do this:

lazy val awsSqsService: QueueService = createsSqsServiceFromConfig()

In createsSqsServiceFromConfig we check if the configuration has a Localstack endpoint and if so, we build LocalStack client:

protected def createsSqsServiceFromConfig(): QueueService = { readSqsClientConfig().map { config => val sqsClient: SqsClient = config.localstackEndpoint match { case Some(endpoint) => new LocalStackSqsClient(endpoint, config.region) case None => new AwsSqsClient(config.region) } new SqsQueueService(config.queueName, sqsClient) }.getOrElse(fakeAwsSqsService) }

readSqsClientConfig is used to get configuration values from .conf files:

private def readSqsClientConfig = {
val sqsName = config.get[String]("aws.sqs.my_queue")
val sqsRegion = config.get[String]("aws.region")
val localStackEndpoint = config.getOptional[String]("aws.localstack.endpoint")
SqsClientConfig(sqsName, sqsRegion, localStackEndpoint)
}

Finally LocalStackSqsClient initialization looks like this:

class LocalStackSqsClient(endpoint: String, region:String) extends SqsClient with Logging {
private val sqsEndpoint = new EndpointConfiguration(endpoint, region)
private val awsCreds = new BasicAWSCredentials("test", "test")
private lazy val sqsClientBuilder = AmazonSQSClientBuilder.standard()
.withEndpointConfiguration(sqsEndpoint)
.withCredentials(new AWSStaticCredentialsProvider(awsCreds))
private lazy val client = sqsClientBuilder.build()

override def BuildClient(): AmazonSQS = { log.debug("Initializing LocalStack SQS service") client } }

Real AWS Client for the test/live environment (a snippet):

    AmazonSQSClientBuilder.standard()
      .withCredentials(new DefaultAWSCredentialsProviderChain)
      .withRegion(region)

Notice that we need fake BasicAWSCredentials that allows us to pass in dummy AWS access key and secret key and then we use AWSStaticCredentialsProvider, an implementation of AWSCredentialsProvider that just wraps static AWSCredentials. When real AWS environment is used, instead of AWSStaticCredentialsProvider we use DefaultAWSCredentialsProviderChain, which picks the EC2 Instance Role if it’s unable to find credentials by any other methods.

And that’s it. Happy coding!

Unit testing 101 – mob rulz

In a recent developer forum I made the rather wild decision to try demonstrate the principles of unit testing via an interactive mobbing session. I came prepared with some simple C# functions based around an Aspnetcore API and said “let’s write the tests together”. The resultant session unfolded not quite how I anticipated, but it was still lively, fun and informative.

The first function I presented was fairly uncontentious – the humble fizzbuzz:

[HttpGet]
[Route("fizzbuzz")]
public string GetFizzBuzz(int i)
{
    string str = "";
    if (i % 3 == 0)
    {
        str += "Fizz";
    }
    if (i % 5 == 0)
    {
        str += "Buzz";
    }
    if (str.Length == 0)
    {
        str = i.ToString();
    }

    return str;
}

Uncontentious that was, until a bright spark (naming no names) piped up with questions like “Shouldn’t 6 return ‘fizzfizz’?”. Er… moving on…

I gave a brief introduction to writing tests using XUnit following the Arrange/Act/Assert pattern, and we collaboratively came up with the following tests:

[Fact]
public void GetFizzBuzz_FactTest()
{
    // Arrange
    var input = 1;

    // Act
    var response = _controller.GetFizzBuzz(input);

    // Assert
    Assert.Equal("1", response);
}

[Theory]
[InlineData(1, "1")]
[InlineData(2, "2")]
[InlineData(3, "Fizz")]
[InlineData(4, "4")]
[InlineData(5, "Buzz")]
[InlineData(9, "Fizz")]
[InlineData(15, "FizzBuzz")]
public void GetFizzBuzz_TheoryTest(int input, string output)
{
    var response = _controller.GetFizzBuzz(input);
    Assert.Equal(output, response);
}

So far so good. We had a discussion about the difference between “white box” and “black box” testing (where I nodded sagely and pretended I knew exactly what these terms meant before making the person who mentioned them provide a definition). We agreed that these tests were “white box” testing because we had full access to the source code and new exactly what clauses we wanted to cover with our test cases. With “black box” testing we know nothing about the internals of the function and so might attempt to break it by throwing large integer values at it, or finding out exactly whether we got back “fizzfizz” with an input of 6.

Moving on – I presented a new function which does an unspecified “thing” to a string. It does a bit of error handling and returns an appropriate response depending on whether the thing was successful:

[Produces("application/json")]
[Route("api/[controller]")]
[ApiController]
public class AwesomeController : BaseController
{
    private readonly IAwesomeService _awesomeService;

    public AwesomeController(IAwesomeService awesomeService)
    {
        _awesomeService = awesomeService;
    }

    [HttpGet]
    [Route("stringything")]
    public ActionResult<string> DoAThingWithAString(
        string thingyString)
    {
        string response;

        try
        {
            response = _awesomeService
                           .DoAThingWithAString(thingyString);
        }
        catch (ArgumentException ex)
        {
            return BadRequest(ex.Message);
        }
        catch (Exception ex)
        {
            return StatusCode(500, ex.Message);
        }

        return Ok(response);
    }
}

This function is not stand-alone but instead calls a function in a service class, which does a bit of validation and then does the “thing” to the string:

public class AwesomeService : IAwesomeService
{
    private readonly IAmazonS3 _amazonS3Client;

    public AwesomeService(IAmazonS3 amazonS3Client)
    {
        _amazonS3Client = amazonS3Client;
    }

    public string DoAThingWithAString(string thingyString)
    {
        if (thingyString == null)
        {
            throw new ArgumentException("Where is the string?");
        }

        if (thingyString.Any(char.IsDigit))
        {
            throw new ArgumentException(
                @"We don't want your numbers");
        }

        var evens = 
            thingyString.Where((item, index) => index % 2 == 0);
        var odds = 
            thingyString.Where((item, index) => index % 2 == 1);

        return string.Concat(evens) + string.Concat(odds);
    }
}

And now the debates really began. The main point of contention was around the use of mocking. We can write an exhaustive test for the service function to exercise all the if clauses and check that the right exceptions are thrown. But when testing the controller function should we mock the service class or not?

Good arguments were provided for the “mocking” and “not mocking” cases. Some argued that it was easier to write tests for lower level functions, and if you did this then any test failures could be easily pinned down to a specific line of code. Others argued that for simple microservices with a narrow interface it is sufficient to just write tests that call the API, and only mock external services.

Being a personal fan of the mocking approach, and wanting to demonstrate how to do it, I prodded and cajoled the group into writing these tests to cover the exception scenarios:

public class AwesomeControllerTests
{
    private readonly AwesomeController _controller;
    private readonly Mock<IAwesomeService> _service;

    public AwesomeControllerTests()
    {
        _service = new Mock<IAwesomeService>();
        _controller = new AwesomeController(_service.Object);
    }

    [Fact]
    public void DoAThingWithAString_ArgumentException()
    {
        _service.Setup(x => x.DoAThingWithAString(It.IsAny<string>()))
            .Throws(new ArgumentException("boom"));

        var response = _controller.DoAThingWithAString("whatever")
                                  .Result;

        Assert.IsType<BadRequestObjectResult>(response);
        Assert.Equal(400, 
            ((BadRequestObjectResult)response).StatusCode);
        Assert.Equal("boom", 
            ((BadRequestObjectResult)response).Value);
    }

    [Fact]
    public void DoAThingWithAString_Exception()
    {
        _service.Setup(x => x.DoAThingWithAString(It.IsAny<string>()))
            .Throws(new Exception("boom"));

        var response = _controller.DoAThingWithAString("whatever")
                                  .Result;

        Assert.IsType<ObjectResult>(response);
        Assert.Equal(500, ((ObjectResult)response).StatusCode);
        Assert.Equal("boom", ((ObjectResult)response).Value);
    }        
}

Before the session descended into actual fisticuffs I rapidly moved on to discuss integration testing. I added a function to my service class that could read a file from S3:

public async Task<object> GetFileFromS3(string bucketName, string key)
{
    var obj = await _amazonS3Client.GetObjectAsync(
        new GetObjectRequest 
        { 
            BucketName = bucketName, 
            Key = key 
        });

    using var reader = new StreamReader(obj.ResponseStream);
    return reader.ReadToEnd();
}

I then added a function to my controller which called this and handled a few types of exception:

[HttpGet]
[Route("getfilefroms3")]
public async Task<ActionResult<object>> GetFile(string bucketName, string key)
{
    object response;

    try
    {
        response = await _awesomeService.GetFileFromS3(
                             bucketName, key);
    }
    catch (AmazonS3Exception ex)
    {
        if (ex.Message.Contains("Specified key does not exist") ||
            ex.Message.Contains("Specified bucket does not exist"))
        {
            return NotFound();
        }
        else if (ex.Message == "Access Denied")
        {
            return Unauthorized();
        }
        else
        {
            return StatusCode(500, ex.Message);
        }
    }
    catch (Exception ex)
    {
        return StatusCode(500, ex.Message);
    }

    return Ok(response);
}

I argued that here we could write a full end-to-end test which read an actual file from an actual S3 bucket and asserted some things on the result. Something like this:

public class AwesomeControllerIntegrationTests : 
    IClassFixture<WebApplicationFactory<Api.Startup>>
{
    private readonly WebApplicationFactory<Api.Startup> _factory;

    public AwesomeControllerIntegrationTests(
        WebApplicationFactory<Api.Startup> factory)
    {
        _factory = factory;
    }

    [Fact]
    public async Task GetFileTest()
    {
        var client = _factory.CreateClient();

        var query = HttpUtility.ParseQueryString(string.Empty);
        query["bucketName"] = "mybucket";
        query["key"] = "mything/thing.xml";
        using var response = await client.GetAsync(
            $"/api/Awesome/getfilefroms3?{query}");
        using var content =  response.Content;
        var stringResponse = await content.ReadAsStringAsync();

        Assert.NotNull(stringResponse);
    }
}

At this point I was glad that the forum was presented as a video call because I could detect some people getting distinctly agitated. “Why do you need to call S3 at all?” Well maybe the contents of this file are super mega important and the whole application would fall over into a puddle if it was changed? Maybe there is some process which generates this file on a schedule and we need to test that it is there and contains the things we are expecting it to contain?

But … maybe it is not our job as a developer to care about the contents of this file and it should be some other team entirely who is responsible for checking it has been generated correctly? Fair point…

We then discussed some options for “integration testing” including producing some local instance of AWS, or building a local database in docker and testing against that.

And then we ran out of time. I enjoyed the session and I hope the other participants did too. It remains to be seen whether I will be brave enough to attempt another interactive mobbing session in this manner…

Spooky season special – tales of terrors and errors

Anyone who has been working in software development for more than a few months will know the ice-cold sensation that creeps over you when something isn’t working and you don’t know why. Luckily, all our team members have lived to tell the tale, and are happy to share their experiences so you might avoid these errors in future… 

The Legend of the Kooky Configuration – Rhys Parsons
In my first job, in the late 90s, I was working on a project for West Midlands Fire Service (WMFS). We were replacing a key component (the Data Flow Controller, or DFC) that controlled radio transmitters and was a central hub (GD92 router) for communicating with appliances (fire engines). Communication with the Hill Top Sites (radio transmitters) was via an X.25 network.

The project was going well, we had passed the Factory Acceptance Tests, and it was time to test it on-site. By this point, I was working on the project on my own, even though I only had about two years of experience. I drove down to Birmingham from Hull with the equipment in a hired car, a journey of around 3.5 hours. The project had been going on for about a year by this point, so there was a lot riding on this test. WMFS had to change their procedures to mobilise fire engines via mobile phones instead of radio transmitters, which, back in the late 90s, was quite a slow process (30 seconds call setup). I plugged in the computers and waited for the Hill Top Sites to come online. They didn’t. I scratched my head. A lot. For an entire day. Pouring over code that looked fine. Then I packed it all up and drove back to Hull.

Back in the office, I plugged in the computer to test it. It worked immediately! Why?! How could it possibly have worked in Hull but not in Birmingham! It made absolutely no sense!

I hired a car for the next day and drove back down to Birmingham early, aiming to arrive just after 9, to avoid the shift change. By this point, I was tired and desperate.

I plugged the computer back in again. I had made absolutely no changes, but I could see no earthly reason why it wouldn’t work. “Sometimes,” I reasoned, “things just work.” That was my only hope. This was the second-day WMFS were using slower backup communications. One day was quite a good test of their resilience. Two days were nudging towards the unacceptable. Station Officers were already complaining. I stared at the screen, willing the red graphical LEDs to turn green. They remained stubbornly red. At the end of the day, I packed up the computer and drove back to Hull.

The WMFS project manager phoned my boss. We had a difficult phone conversation, and we decided I should go again the next day.

Thankfully, a senior engineer who had the experience of X.25 was in the office. I told him of this weird behaviour that made no sense. We spoke for about two minutes which concluded with him saying, “What does the configuration look like?”

My mouth dropped. The most obvious explanation. I hadn’t changed the X.25 addresses! I was so busy wondering how the code could be so weirdly broken that I hadn’t considered looking at the configuration. So, so stupid! I hadn’t changed the configuration since I first set up the system, several months earlier, it just wasn’t in my mind as something that needed doing.

Day three. Drove to Birmingham, feeling very nervous and stupid. Plugged in the computer. Changed the X.25 addresses. Held my breath. The graphical LEDs went from red to orange, and then each Hill Top Site went green in turn, as the transmit token was passed back and forth between them and the replacement DFC. Finally, success!

A Nightmare on Character Street – Rosie Chandler
We recently implemented a database hosted in AWS, with the password stored in the AWS Secrets Manager. The password is pulled into the database connection string, which ends up looking something like this:

“Server=myfunkyserver;Port=1234;Database=mycooldatabase;User ID=bigboss;Password=%PASSWORD%”

Where %PASSWORD% here is substituted with the password pulled out of the Secrets Manager. We found one day that calls to the database started throwing connection exceptions after working perfectly fine up until that point. 

After spending a lot of time scratching my head and searching through logs, I decided to take a peek into the Secrets Manager to see what the password was. Turns out that day’s password was something like =*&^%$ (note it starts with “=”) which means that the connection string for that day was invalid. After much facepalming, we implemented a one-line fix to ensure that “=” was added to the list of excluded characters for the password.

The Case of the Phantom Invoices – Chris Rimmer
Many years ago I was responsible for writing code that would email out invoices to customers. I was very careful to set things up so that when the code was tested it would send messages to a fake email system, not a real one. Unfortunately, this wasn’t set up in a very fail-safe way, meaning that another developer managed to activate the email job in the test system and sent real emails to real customers with bogus invoices in them. This is not the sort of mistake you quickly forget. Since then I’ve been very careful configuring email systems in test environments so that they can only send emails to internal addresses.


Tales from the Dropped Database – Rich Brown
It was a slow and rainy Thursday morning, I was just settling into my 3rd cup of coffee when a fateful email appeared with the subject ‘Live site down!!!’

Ah, of course, nothing like a production issue to kick-start your morning. I checked the site: it was indeed down. Sadly, the coffee would have to wait.

Logging onto the server, I checked the logs. A shiver ran down my spine.

ERROR: SQL Error – Table ‘users’ does not exist

ERROR: SQL Error – Table ‘articles’ does not exist

ERROR: SQL Error – Table ‘authors’ does not exist

ERROR: SQL Error – Database ‘live-db’ does not exist

That’s…. unusual…

Everything was working and then suddenly it stopped, no data existed.

Hopping onto the database server showed exactly that. Everything was gone, every row, every table, even the database itself wasn’t there.

I pulled in the rest of the team and we scratched our collective heads, how could this even happen? The database migration system shouldn’t be able to delete everything. We’ve taken all the right mitigations to prevent injection attacks. There’s no reason for our application to do this.

I asked, “What was everyone doing when the database disappeared?”

Dev 1 – “Writing code for this new feature”

Dev 2 – “Updating my local database”

Dev 3 – “Having a meeting”

Ok, follow up question to Dev 2 – “How did you update your database?”

Dev 2 – “I dropped it and let the app rebuild it as I usually do”

Me – “Show me what you did”

ERROR: SQL Error – Cannot drop database ‘live-db’ because it does not exist

Turned out Dev 2 had multiple SQL Server Manager instances open, one connected to their local test database and the other connected to the live system to query some existing data.

They thought they were dropping their local database and ended up dropping live by mistake.

One quick database restore and everything was back to normal.

Moral of the story, principle of least access. If you have a user who only needs to read data, only grant permissions to read data.

Wortüberbreitedarstellungsproblem

Don’t worry if you don’t understand German, the title of this post will make sense if you read on…

We’ve been working for the last few years with De Gruyter to rebuild their delivery platform. This has worked well and we have picked up an award along the way. Part of our approach has been to push out new features and improvements to the site on a weekly basis. Yesterday we did this, deploying a new home page design that has been a month or two in the making. The release went fine, but then we started getting reports that the new home page didn’t look quite right for users on iPhones and iPads. I took a look – it seemed fine on my Android phone and on my daughter’s iPhone. A developer based in India looked on his iPhone with different browsers and everything was as expected. But somehow German users were seeing text that overflowed the edge of the page. So what was going on – how could German Apple devices be so different? Most odd.

It turned out that the problem was not a peculiarity of the German devices, but of the German language. German is famous for its long compound words (like the title of this post) and often uses one big word where English would use a phrase. Our new homepage includes a grid of subjects that are covered in books that De Gruyter publishes. In English these subjects mostly have quite short names, but in German they can be quite long. For smaller screens the subject grid would shift from three to two columns, but even so this was not enough to accommodate the long German words, meaning the page overflowed.

Subject grid in German

The fix was quite a simple one, for the German version of the page the grid would shift to two columns more readily and then to a single column for a phone screen. But I think the lesson is that there is more to catering for different languages than checking the site looks fine in English and that all the text has been translated. The features of the target language can have unexpected effects and need checking. It’s easy to overlook this when dealing with two languages that are apparently quite similar.

On a similar note, it can be easy to be complacent that your site is easy to use because you understand it or believe it is accessible to those using a screen reader because you have added alt text onto images. Just because it works for you doesn’t mean it works for others and that always needs bearing in mind.

Finally, that title? It translates as something like “Overly wide word display problem” and was suggested by someone at De Gruyter as a German compound word to describe the problem we saw.

Embracing Impermanence (or how to check my sbt build works)

Stable trading relationships with nearby countries. Basic human rights. A planet capable of sustaining life. What do these three things have in common?

The answer is that they are all impermanent. One moment we have them, the next moment – whoosh! – they’re gone.

Today I decided I would embrace our new age of impermanence insofar as it pertains to my home directory. Specifically, I wondered whether I could configure a Linux installation so that my home directory was mounted in a ramdisk, created afresh each time I rebooted the server.

Why on earth would I want to do something like that?

The answer is that I have a Scala project, built using sbt (the Scala Build Tool), and I thought I’d clear some of the accumulated cruft out of the build.sbt file, starting with the configured resolvers. These are basically the repositories which will be searched for the project’s dependencies – there were a few special case ones (e.g. one for JGit, another for MarkLogic) and I strongly suspected that the dependencies in question would now be found in the standard Maven repository. So they could probably be removed, but how to check, since all of the dependencies would now exist in caches on my local machine?

A simple solution would have been to delete the caches, but that involves putting some effort into finding them, plus I have developed a paranoid streak about triggering unnecessary file writes on my SSD. So I had a cunning plan – build a VirtualBox VM and arrange for the home directory on it to be a ramdisk, thus I could check the code out to it and verify that the code will build from such a checkout, and this would then be a useful resource for conducting similar experiments in the future.

Obviously this is not quite a trivial undertaking, because I need some bits of the home directory (specifically the .ssh directory) to persist so I can create the SSH keys needed to authenticate with GitHub (and our internal GitLab). Recreating those each time the machine booted would be a pain.

After a bit of fiddling, my home-grown solution went something like this:

  • Create a Virtualbox VM, give it 8G memory and a 4G disk (maybe a bit low if you think you’ll want docker images on it; I subsequently ended up creating a bigger disk and mounting it on /var/lib/docker)
  • Log into VM (my user is daniel), install useful things like Git, curl, zip, unzip etc.
  • Create SSH keys, upload to GitHub / GitLab / wherever
  • Install SDKMAN! to manage Java versions
  • Create /var/daniel and copy into it all of the directories and files in my home directory which I wanted to be persisted; these were basically .ssh for SSH keys, .sdkman for java installations, .bashrc which now contains the SDKMAN! init code, and .profile
  • Save the following script as /usr/local/bin/create_home_dir.sh – this wipes out /home/daniel, recreates it and mounts it as tmpfs (i.e. a ramdisk) and then symlinks into it the stuff I want to persist (everything in /var/daniel)
#!/bin/bash
DIR=/home/daniel

mount | grep $DIR && umount $DIR

[ -d $DIR ] && rm -rf $DIR

mkdir $DIR

mount -t tmpfs tmpfs $DIR

chown -R daniel:daniel $DIR

ls -A /var/daniel | while read FILE
do
  sudo -u daniel ln -s /var/daniel/$FILE $DIR/
done
  • Save the following as /etc/systemd/system/create-home-dir.service
[Unit]
description=Create home directory

[Service]
ExecStart=/usr/local/bin/create_home_dir.sh

[Install]
WantedBy=multi-user.target
  • Enable the service with systemctl enable create-home-dir
  • Reboot and hope

And it turns out that this worked; when the server came back I could ssh into it (i.e. the authorized_keys file was recognised in the symlinked .ssh directory) and I had a nice empty workspace; I could git clone the repo I wanted, then build it and watch all of the dependencies get downloaded successfully. I note with interest that having done this, .cache is 272M and .sbt is 142M in size. That seems to be quite a lot of downloading! But at least it’s all in memory, and will vanish when the VM is switched off…

STEM Ambassadors In the Field

(Or a fun way to introduce local kids to programming)

A previous employer encouraged me to join the STEM Ambassador program at the end of 2017 (https://www.stem.org.uk/stem-ambassadors) and I willingly joined, wanting to give something back to society. The focus of the program is to send ambassadors into schools and local communities, to act as role models and to demonstrate to young people the benefits and rewards that studying STEM subjects can bring. I approached my local primary school (at the time my daughter was a pupil there) about the possibility of setting up an after-school computing club, and they jumped at the chance.

I started the club unsure what to expect, but with a lot of hope and some amount of trepidation. I took on groups of 10 or so KS2 pupils, teaching them the basics of loops, events, variables and functions, largely using Scratch (https://scratch.mit.edu/) and an eclectic mix of programmable robots that I’d acquired over the years (I have a few from Wonder Workshop https://www.makewonder.com/robots/ and also a pair of Lego Boost robots https://www.lego.com/en-gb/product/boost-creative-toolbox-17101). Running the club was extremely rewarding. Some of the kids were brilliant, and will no doubt have a great future ahead of them. Others mainly wanted only to drive the robots around – but I figured that as long as they were having fun then their and my time was well spent.

Then, in March 2020, the Covid-19 pandemic hit. Kids were sent home for months, and all clubs were cancelled, with no knowing when they might start up again. The pandemic has obviously been tough for everyone, but one of the hidden effects has been the impact on the education of our children. It will take years, probably, to know exactly what effect two years of lockdown has had on the attainment opportunities and mental heath of young people. Many of them missed out not only on in-person schooling, but also on all the additional extra-curricular opportunities like school visits, and also things like the STEM Ambassador program.

So now, two years and a change of jobs later, I thought it was about time I got myself back in the field, and start up my STEM activities again.

My first opportunity has been to run a “retro games arcade” stall at the school’s summer fair. This involved commandeering a tiny wooden cabin plonked the wrong-way-round on the edge of the school field, next to one of the temporary classrooms. To turn this into a games arcade I needed to black out the windows to make it dark enough inside to see a computer screen, then to run an extension lead out of the window of the classroom, and to quietly steal a few chairs and tables upon which to set up my “arcade consoles”. Blacking out the windows was achieved by covering them up with garden underlay and sticking drawing pins around the edges (much to the detriment of my poor thumbs).

The field and cabin in which I did my STEM Ambassadoring, with the (mostly willing) assistance of my daughter

For the arcade machines, I wrote two games in Scratch based around the classic arcade games “Defender” and “Frogger”. I set up two laptops to run these games, covering over all but the arrow keys, trackpad and spacebar with shiny card. My aim was to write games that the students could replicate themselves, if they wished. I wanted games simple enough that a small child could play, but would also be fun for an older child or a parent to play as well. The gameplay should ideally last for 1-4 minutes, and the player should be able to accumulate a high score. As the afternoon progressed I kept track of the highest two scores in each game so that the players with these scores could win a prize at the end of the afternoon.

If you’re interested in seeing these games then you can have a look here:

Defender: https://scratch.mit.edu/projects/711066827/

Frogger: https://scratch.mit.edu/projects/317968991/

Of course the afternoon in question was one of the hottest days of the year. I spent 3 hours diving into and out of the tiny sweltering cabin, caught between managing the queue, taking the 50p fee, handing out Pokémon cards to the players (I got a stack of them and gave one out to every player), explaining to the kids how to play the games, and keeping track of the ever-changing high scores. I did have willing help from my daughter (who especially liked taking the money) and my husband (who seemed adept at managing the queue). At some point I managed to eat a burger and grab a drink, but it was a pretty frenetic afternoon.

67 Bricks agreed to give me £50 to pay for prizes. I bought Sonic and Mario soft toys, a Lego Minecraft set, and a large pack of assorted Pokémon cards. I also washed up a Kirby soft toy that I found in my daughter’s “charity shop” pile and added that to the prize pool. Throughout the afternoon I kept track of the top two highest scores in both games, using the incredibly high-tech method of a white-board and dry-wipe marker. The hardest part was figuring out how to spell everyone’s name, and in moving the first-place score to second place every time a high-score was beaten. Oh, and making sure the overly-enthusiastic children didn’t wander off with poor Mario before the official prize giving ceremony.

As the afternoon progressed I encountered some kids who aced the games, and actively competed with each other to keep their place at the top of the leader board. Other children struggled to control the game and I had to give them a helping hand (quite literally – I said I would control the cursor keys while they controlled the space bar). And then there was the dad who was determined to win a prize for his child, and kept returning to make sure of his position on the leader board. But eventually the last burger was eaten, the arcade was closed, and the prizes announced. Four children went home happily clutching their prizes and the rest their collection of assorted Pokémon cards.

For the next step in my STEM Ambassador journey, I have agreed to start up the computing club again in September. I’m hoping to teach the children the skills to write their own arcade games in Scratch. Watch this space.

Things Customers Don’t Understand About Search

Note, this post is based on a dev forum put together by Chris.

Full-text search is a common feature of systems 67 Bricks build. We want to make it easy for users to find relevant information quickly often through a faceted search function. Understanding user needs and building a top notch user experience is vital. When building faceted search, we generally use either ElasticSearch (or AWS’s OpenSearch) or MarkLogic. Both databases offer very similar feature sets when it comes to search, though one is more targetted towards JSON based documents and the other, XML.

Search can seem magical at first glance and do some amazing things but this can lead to situations where customers (and UX/UI designers) assume the search mecahnism can do more than it can. We frequently find a disconnect between what is desired and what is feasable with search systems.

There are 2 main categories of problems we often see are:

  1. Customers / Designers asking for things that could be done, but often come with nasty performance implications
  2. Features that seem reasonable to ask for at first glance, but once dug into reveal logical problems that make developing the feature near impossible

Faceted Search

Faceted search systems are some of the most common systems we build at 67 Bricks. The user experience typicallly starts with a search box that they enter a number of terms into, hit enter and then be presented with a list of results in some kind of relevancy order. Often there is a count of results displayed alongside a pagination mechanism to iterate through the results (e.g. showing results 1-10 of 12,464). We also show facets, counts for how many results fit into different buckets. All this is handled in a single query that often takes less than 100ms which seems miraculous. Of course, this isn’t magic, full-text search systems use a variety of clever indexes to make searching and computing the facet counts quick.

Lets make a search system for a hypothetical website cottagesearch.com. Our first screen will present the user with some options to select a location, the date range they want to stay and how many guests are coming. We perform the search and show the matching results. How should we display the results and more importantly, how do we show the facets?

Let’s say we did a search for 2 bedroom cottages. We’ve seen wireframes for a number of occassions where the facet count for all bedroom numbers are displayed. So users see the number of results applicable to each bedroom count they would get if they didn’t limit the search to just 2 bedrooms (i.e. there aren’t that many 2 bed options, but look at how many 3 bed options are available). At first glance, this seems like a sensible design, but fundmanetally breaks how search systems work with faceting, they will return counts, but only for the search just done.

We could get around this by doing 2 searches, 1 limited by bedrooms and one that does not to retrieve the facet counts. This may seem like a sensible idea when we have 1 facet, but what do we do when we have more? Do we need to do multiple searches, effectively making an N+1 problem? How to we display numbers? Should the counts for the location facet include the limit of bedrooms or not? As soon as we start exploring additional situations we start to see the challenges the original design presents.

This gets harder when we consider non-exclusionary facets. Let’s say our cottage search system lets you filter by particular features, such as a wood burner, hot tub or dishwasher. Now, if we show counts of non-selected facets, what do these numbers represent? Do they include results that already include the selected facet or not? Here, the logic starts to break down and becomes ever more confusing to the end user and difficult to implement for the developer.

Other Complex Facet Situations

A common question we need to ask with non-exclusionary facets: Is it an AND or an OR search? The answer is very domain dependant, but either way we suggest steering away from facets counts in these situations.

Date ranges provide an interesting problem, some sites will purposefully search outside of the selected range so as to provide results near the selected date range. This may be a useful or annoying depending on what the user expects and is trying to achieve. Some users would want exact matches and would have no interest in results that do not meet the selected date range.

Ordering facets is also a questions that may be overlooked. Do you order lexographically or do you order by descending number of matches? What about names, year ranges or numeric values? Again, a lot of what users expect and would want comes down to the domain being dealt with and the needs of the users.

When users select a new facet, what should the UI do? Should the search immediately rerun and the results and facets update or should there be a manual refresh button the user has to select before the search is updated? An immediate refresh would be slower, but let users narrow down carefully, while a manual update would reduce the number of searches done, but then users may be able to select a number of facets in such a way that no results would be returned.

Hierarchies can also prove tricky. We often see taxonomies being used to inform facets, say subjects with sub categories. How should these be displayed? Again there are many solutions to pick from with different sets of trade-offs.

Advanced Search

Advanced search can often be a bit like a peacocks tail – something that looks impressive, but doesn’t contribute a fair share of value based on how much effort it takes to develop. A lot of designers and product owners love the idea of it but in practice, it can end up being somewhat confusing to use and many end users end up avoiding it.

Boolean builders exist in many systems where the designer of advanced search will insist on allowing users to build up some complex search with lots of boolean AND/OR options, but displaying this to users in a way they can understand is challenging. If a user builds a boolean search such as: GDP AND Argentina OR Brazil do we treat it as (GDP AND Argentina) OR Brazil or should it be interpreted as GDP AND (Argentina OR Brazil). We could include brackets in the builder, but this just further complicates the UI.

We frequently get bugs and feedback on advanced search, some of this feedback can amount to different users having contradictory opinions on how it should work. We would ask product owners to carefully consider “How many people will use it?” Google has a well build UI for advanced search that does away with the challenges of boolean logic by having separate fields for ANDs ORs and NOTs.

Google advanced search UI

An advanced search facility can introduce additional complexity when combined with facets. If an advances search lets you select some facets before completing the search, does this form part of the string in the search box? We have had mixed results with enabling power users to enter facets into search fields (e.g. bedrooms:3), but this can be tricky, some users can deal with it, but others may prefer a advanced search builder while others will rely on facets post search.

Summary

In conclusion, we have 3 main takeaways

  • Search is much more complex than it first appears
  • Facets are not magic, just because you can draw a nice wireframe doesn’t make it feasable to develop
  • Advanced search can be tricky to get right and even then, only used by a minority of users

We’ve build many different types of search and have experimented with a number of approaches in the past and we offer some tried and tested principles:

  • Make searches stateless – Don’t add complexity by trying to maintain state between facets changes, simply treat each change as a fresh search. That way URLs can act as a method of persistence and bookmarking common searches.
  • Have facets only display counts for the current search and do not display counts for other facets once one has been selected within that category.
  • Only use relevancy as the default ordering mechanism – You may be tempted to allow results to be ordered in different ways, such as published date, but this can cause problems with weakly matching, but recent results appearing first.
  • Don’t build an advanced search unless you really need to and if you have to, use a Google style interface over a boolean query builder.
  • Check that search is working as expected – Have domain experts check that searches are returning sensible results and look into using analytics to see if users are having a happy journey through the application (i.e. run a search and then find the right result within the first few hits).
  • Beware of exhaustive search use cases – As many search mechanisms work on some score based on relevancy to the terms entered, having a search that guarantees a return of everything relevant can be tricky to define and to develop.

My Journey to Getting AWS Certified

When I joined 67 Bricks in January 2021 I knew close to zero about AWS, and not-a-lot about cloud services in general. I had dabbled a bit in Azure in my previous job, and I understood the fundamentals of what “the cloud” was, but I was very aware that I’d have to get up to speed if I wanted to be useful at developing applications on AWS. I joined our team on the EIU project, and on day one I was exposed to discussions about S3 buckets, lambda functions, glue jobs and SNS topics – all things I knew nothing about.

I asked one of the EIU enablement team to give me an overview, and I was introduced to the AWS console and shown some of the key services. Over the next few months I gradually started to get to grips with the basics – I learned how to upload to and download objects from S3, write to and query a DynamoDB table, and search for things in CloudWatch. I was very proud when I wrote my first lambda function, but I still felt like I was winging it.

I was encouraged by our development manager to look into obtaining some AWS certifications. The obvious starting point was Cloud Practitioner (https://aws.amazon.com/certification/certified-cloud-practitioner/?ch=sec&sec=rmg&d=1) which covers the basics of what “the cloud” is, and the applications of core AWS services. The best course I found to prepare for this was one from Amazon themselves https://explore.skillbuilder.aws/learn/course/134/aws-cloud-practitioner-essentials (you might need to sign in to the skill builder to access it, but the course is free). It uses the analogy of a coffee shop to explain the concepts of instances, scaling, load balancing, messaging and queueing, storage, networking etc, in an easy to understand manner. After a lot of procrastinating, and wondering if I was ready, I eventually took the exam in October 2021 and passed it with a respectable score.

The cloud practitioner course covers AWS services in an abstract manner – you learn about the core services without ever having to use them. In fact you could probably pass the course without ever logging into the AWS console. To demonstrate real experience and knowledge of AWS services, I decided that the certification to go for next was Developer Associate (https://aws.amazon.com/certification/certified-developer-associate/?ch=sec&sec=rmg&d=1). AWS doesn’t offer their own course to study for this certification – instead they provide links to numerous white papers, which make for fairly dry reading, and it is not clear exactly what knowledge is and is not required.

After doing a bit of research I decided that this course on Udemy https://www.udemy.com/course/aws-certified-developer-associate-dva-c01/ by Stephane Maarek was the most highly rated. With 32 hours of videos to absorb, this was not a trivial undertaking, but after slotting in a few hours of study either before work or in the evenings, I made it through with two books stuffed with notes.

The Developer Associate certification requires you to understand at a fairly deep level how the AWS compute, data, storage, messaging, monitoring and deployment services work, and also to understand architectural best practices, the AWS shared responsibility model, and application lifecycle management. A typical exam question for Developer Associate might ask you to calculate how many read-capacity-units or write-capacity-units a DynamoDB table consumes under various circumstances. Another one might test your understanding of how many EC2 instances a particular auto-scaling policy would add or remove. Another question might require you to understand what lambda concurrency limits are for.

After working my way through a number of practice exams (the best ones seem to be by Jon Bonzo, again on Udemy https://www.udemy.com/course/aws-certified-developer-associate-practice-exams-amazon/) I took the plunge and sat the exam in January 2022, again passing with a respectable score.

But what next? The knowledge I’d gained up until this point had given me real practical skills, and a deeper knowledge of how the various AWS services connect together. For example, it was no longer a mystery how lambda functions could be triggered by SNS topics or messages from an SQS queue, and could then call another API perhaps hosted on EC2 to initiate some other process. And I could understand how to utilise infrastructure-as-code (e.g. CloudFormation or CDK) along with services like CodePipeline and CodeDeploy, to automate build processes. But I wanted a greater understanding of the “bigger picture”, and so next I chose to go for the Solutions Architect Associate certification (https://aws.amazon.com/certification/certified-solutions-architect-associate/?ch=sec&sec=rmg&d=1).

The Solutions Architect Associate exam typically presents a scenario and then asks you to choose which option provides the best solution. One option is usually wrong, but there could be more than one solution which would work – but you have to scrutinise the question to see which one best meets the requirements of the scenario. Are they asking for the cheapest solution? Or the fastest? Or the most fault tolerant? (Look for clues like “must be highly available” – and so the correct answer will probably involve multi-AZ deployments). Is any down-time acceptable? Is data required in real time, or is a delay acceptable? (E.g. do we choose Kinesis or SQS?) If a customer is migrating to the cloud are there time constraints, and how much data is there to migrate? (E.g. it can take a month or two to set up a Direct Connect connection, but you could have a Snowmobile in a week. A VPN might work but there are limits to the data transfer rates).

Again, I chose Stephane Maarek’s course on Udemy (https://www.udemy.com/course/aws-certified-solutions-architect-associate-saa-c02/) – his study materials are clear and he also notes which sections are duplicates of those in the developer associate course. I again used Jon Bonzo’s practice exams (https://www.udemy.com/course/aws-certified-solutions-architect-associate-amazon-practice-exams-saa-c03/). There is a fairly hard-core section on VPC, which is something I struggled with. Stephane presents a spaghetti-like diagram showing the relationship between VPCs, public and private subnets, internet gateways, NAT gateways, security groups, route tables, on-premise set-ups, VPC endpoints, transit gateways, direct connections, VPC peering connections etc – and says “by the end of this section you’ll know what all of this means”. He was right, but as someone with limited networking experience and knowledge, I found it pretty tough.

I sat the exam in April 2022, a day before I figured out that the cough and fatigue I’d developed was actually Covid. I passed the exam respectably again, and then collapsed into bed for a few days to recover.

At this point it’s probably worth mentioning how the exam process works. If you like, you can book an exam in an approved test centre. However, I chose to go with the “online proctored” exams hosted by Pearson Vue. You book an exam slot – generally plenty are available at all times of the day and night, and you can usually find a slot within the next day or two that suits. For the exam you need to be sitting at a clear table with nothing within arms reach. Not even a tissue or a glass of water. You need to run some Pearson software on your laptop that checks no other processes are running (so turn off slack, email, shut down your docker containers etc etc), and then launches their exam platform. You will be asked to present photo ID, and then show the proctor your testing environment. They will want to see your chair and table from all angles, and will want to see your arms to make sure you’re not wearing a watch or have anything hiding up your sleeves. You need your mobile phone in the room, but out of reach, in case they need to call you. And you also need to make sure you are undisturbed in the room for the duration of the exam (which is typically 2-3 hours).

This last point was challenging for me. My home-office is not suitable – being far to crammed with potential cheat material, and I also share it with my husband. The only suitable place is my dining table, in the very open-plan ground floor of my house. Finding a time when I can have the ground-floor to myself for 2-3 hours means scheduling the exam for around 7AM in the morning on a day when the kids are not at school. I ended up putting “do not disturb” signs on the door and issuing dire warnings to everyone that they mustn’t come downstairs until I’d given them the all-clear. Anyone wandering sleepily through the room on a quest for coffee could result in the exam proctor dropping my connection and disqualifying me from the exam. Fortunately, all was well and all the exams I’ve sat so far were carried out without incident.

After obtaining the Solutions Architect Associate certification I thought about taking a break. But then I took a look at the requirements for SysOps Administrator Associate (https://aws.amazon.com/certification/certified-sysops-admin-associate/?ch=sec&sec=rmg&d=1) and realised that I’d already covered about two-thirds of the required material. Now SysOps is not something I have a love for. I have a deep respect for people who understand deployments and pipelines and infrastructure. The Enablement team at the EIU, who I work closely with, are miracle workers who regularly perform magic to get things up and running. The idea that I could learn some of that wizardry seemed far-fetched. But I thought I might as well give it a go.

The SysOps certificate focusses a lot on configuration and monitoring. You learn a lot about load balancers, autoscaling policies, CloudFormation and CloudWatch. And yes, all that indepth knowledge about VPCs and hybrid-cloud set-ups is applicable here too. A typical exam question will present a scenario where something has gone wrong, and you have to pick the best option to fix it. For example, someone can’t SSH into an EC2 instance because something is wrong with the security group. Or someone in a child account of a parent organisation can’t access something in another child account. Yet again I went to Stephane Maarek’s course, which was again excellent (https://www.udemy.com/course/ultimate-aws-certified-sysops-administrator-associate/). And Jon Bonzo again provided the practice exams (https://www.udemy.com/course/aws-certified-sysops-administrator-associate-practice-exams-soa-c01/).

I sat the SysOps exam in June 2022. One thing that caused a little trepidation was that this exam includes “exam labs” – these are practical exercises carried out in the AWS console. It was hard to prepare for these because I could not find any practice labs on-line, and so I was going in cold. However, it turned out that the labs were well defined with clear steps on what was required. Even the ones where I had never really looked at the service before, I was able to find it in the console and figure out what I needed to do. I was asked to:

  • Create a backup plan for an EFS system with two types of retention policy
  • Update a CloudFormation stack to fiddle with some EC2 settings, roles, route tables etc
  • Create an S3 static website and configure some Route 53 failover policies

The second of these caused me the most difficulty – I hadn’t anticipated actually having to write a CloudFormation template – they provided one which I needed to edit and it took me a while to figure out how to actually do this. Turns out that you need to save a new version of the template locally and then re-upload it.

I passed the SysOps exam with a more modest mark than for the other certifications, and I definitely breathed a sigh of relief. I am now definitely taking a breather – perhaps in a few months I might take a look at some of the specialist certifications (maybe Data Analytics?) but for the moment I’m going to get back to some of my other neglected hobbies (I like to draw, and play the piano, and one day I’ll maybe finish my epic fantasy trilogy).

The key take-aways from my experience are:

  • The associate level certifications require you to acquire knowledge that is directly applicable in the day-to-day life of a developer or systems administrator.
  • I was initially concerned that the courses would be part of a propaganda machine from AWS, encouraging us to spend ever larger amounts on AWS services. I found this to not be the case at all. Quite a large part of the material teaches us how to save costs, and how to incorporate our existing on-premises infrastructure with AWS, rather than replacing it entirely.
  • Sitting an exam in your own home is definitely preferable than travelling to a test centre – you get far more flexibility over when you can take the exam. However, not everyone will have a suitable place at home to take the exam, particularly if you share your home with other people, or you do not have a suitable table to work at.
  • Studying for these certifications will require a significant time commitment. The online courses run for 20-30 hours or more, assuming you never pause the videos to take notes, or repeat a section. And that is before you take time to revise or do practice exams.
  • Definitely the most valuable tool for preparing for the exams is by completing as many practice exams as you can find. The best ones include detailed explanations about why a particular answer is correct and the others are wrong.
  • Also note that these certifications have an expiry date – typically 3 years – and also the courses are refreshed periodically. For example, the Solutions Architect Associate is being refreshed at the end of August and Solutions Architect Professional is being refreshed in November.