This post is a follow-up to one I wrote just over a year ago about my experience running a computing club at a local primary school before the Covid pandemic, and then resuming my STEM Ambassador activities last summer by running a retro games arcade at the school summer fair (https://blog.67bricks.com/?p=541). I’ve since resumed my computing club and thought it would be worthwhile to give a proper account of my experiences.I started the club in April 2018, full of enthusiasm but with little knowledge of appropriate techniques for imparting knowledge to 8-year-olds. I was armed with five robots: two “Dash” robots and one “Cue” robot from Wonder Workshop (https://uk.makewonder.com) and two Lego Boost robots (https://www.lego.com/en-gb/product/boost-creative-toolbox-17101), a few ageing iPads and some Kindle Fires that I’d got cheap from a Black Friday deal. I also had a working knowledge of Scratch (https://scratch.mit.edu/) and a bunch of ideas.
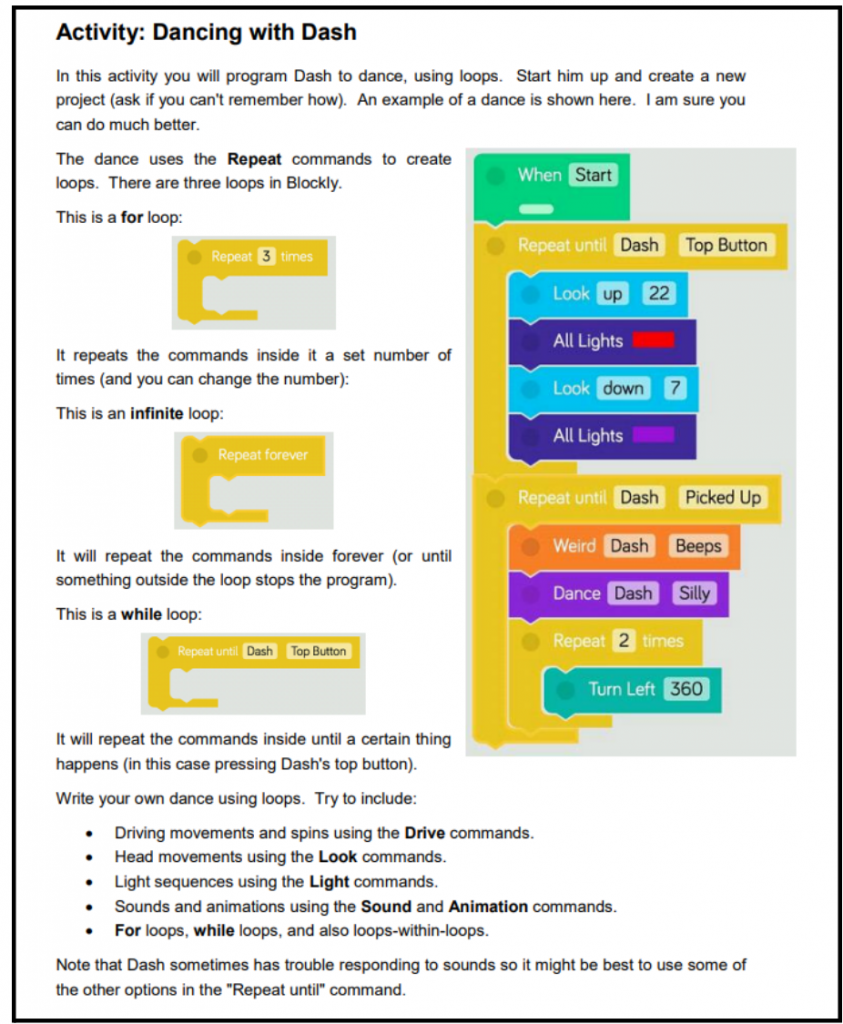
I spent an inordinate amount of time preparing a 10-week course for the first bunch of students that were unleashed upon me. I prepared a full set of worksheets to cover concepts like algorithms, loops, functions and events – including an activity using the robots and an equivalent activity using Scratch. Here’s an example of an activity to learn loops by getting the Dash robot to dance:
I turned up to my first session clutching my worksheets, with a suitcase full of robots and tablets, and half a plan for how to teach something useful to a group of 8-11 year-olds. I learned a number of important things in that first session:
Kids don’t like worksheets. At best they will be ignored. At worst they will be crumpled up and trodden underfoot. It doesn’t matter how beautiful or colourful they are, how carefully crafted – literally nobody is interested in them. They will gather dust until you admit defeat and shove them in the recycling bin.
Any IT equipment the school has will either not work, or will be locked down to the extent that I won’t be able to use it. If the school has anyone with IT expertise they’ll likely be a contractor who only turns up at the school for a few hours on a Tuesday morning, and their only interest in my club will be in making sure that I don’t break any of their kit. The “smart screens” adorning the walls of the classrooms are pretty ornaments which are not to be used by the likes of me. I got round this by bringing in my own projector and pointing it at a convenient wall. The school might have iPads but nobody knows how to install any apps on them. School laptops are always out of battery power and access to them is via some sort of free-for-all.
Kids are powered by snacks. Lots and lots of them. You have no power to stop them munching biscuits throughout your session, despite protestations that greasy fingers and school laptops are not a good combination.
Kids also have teeny tiny bladders (or at least claim to have) and so perpetually want to duck into and out of the session to visit the facilities. Generally, preventing them from going in packs of four at a time is a good idea.
Robots are very popular – but robots made from Lego are very fragile and generally do not survive being driven off a desk. It’s also tenuous as to whether they will survive the journey to school stuffed into a soft suitcase.
Children do not like to share. Five robots between 12 children often resulted in tussles and gentle reminders that there was time for everyone to have a turn.
Some kids are better than me, and will storm ahead, completing all the exercises and then begin pestering me for more. Some just want to draw pictures in Scratch and ignore whatever activity I have planned. There are those who don’t get it at all, even if you sit beside them and write all their code. Others just want to mess about and play with the robots. All of these are fine. An after school club should not be “just more school” and it’s OK as long as everyone is having fun.
The club progressed nicely for two years, with some just trying it out for a term and others returning again and again. I gradually adapted the sessions to be a bit less planned. What worked well was me working through a challenge on my screen step-by-step with the students following along. If some of them raced ahead I would encourage them to add their own ideas to their program. If others lagged behind I would stop to help them, or pair them up with someone else who had already progressed to that point.
We would write simple games like Space Invaders or football. We would simulate simple physical systems like diffusion, liquid flow or bouncing balls. Or we would get the robots to draw pictures, make music, or dance.
Some of the highlights were:
Following a line on the floor:
Simulating a traffic crossing with three robots:
Tidying up Lego pieces:
Various types of digital (and not-so-digital) art:
When the COVID pandemic hit in March 2020 I had to shut the club down and I was only able to resume it again in September 2022. I wrote in my previous blog post about the effects of the pandemic on education, but the lack of access to clubs and social activities is probably one of the less obvious impacts on a child’s wellbeing.
I was keen for my club to remain accessible to everyone and for activities to become more open-ended rather than just following my instructions step-by-step. Some approaches I took were:
Giving guidance on some of the techniques required to write a game (e.g. getting a Scratch sprite to move, jump, bounce or fire projectiles) and then supervising while the children designed their own games.
Writing a “story” by creating a sequence of animated backdrops through which sprites moved through (it’s amazing how many of these turned into horror tales involving zombies and vampires)
The broad aim of the STEM Ambassador program is to provide young people with a link from STEM subjects to the real world of work, so as to inspire the next generation in STEM. I hope that in a small way my club has helped to do this.
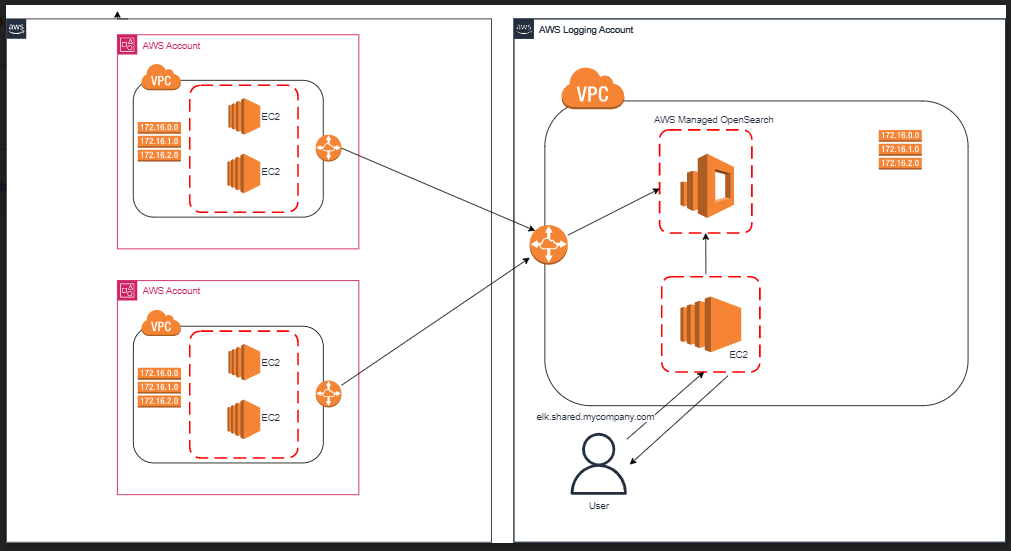
If you’ve had a look around 67 Bricks website, you probably know that we work with quite a few clients. For most of the clients we host their infrastructure, which makes it easier for us to manage it and troubleshoot any issues when they occur. Each client’s infrastructure resides in its own AWS account, which is a part of AWS Organizations. We also have a logging AWS account which is used for infrastructure resources used by client accounts. In this shared account we have set up an ELK stack to collect logs from multiple clients in one place. In this post I will explain how it is set up.
What is ELK?
ELK stands for ElasticSearch, Logstash and Kibana.
A note: in this post I’m going to mention Amazon OpenSearch Service. In the past was called Amazon ElasticSearch Service. Amazon OpenSearch Service uses a fork of older version of ElasticSearch and Kibana. The name ELK, however, seems to have stuck even if OpenSearch is used instead of ElasticSearch (and ELK sounds nicer than OLK, in my opinion).
What is the infrastructure like?
The main elements are AWS Managed OpenSearch instance and an EC2 reverse proxy, which directs requests to OpenSearch. In terms of networking we have VPC peering connections between the VPC of the logging account, where OpenSearch instance resides, and the client account VPCs.
To clarify the above diagram:
Applications send log entries via peering connections. In order for them to be able to do that, the following is required:
1) The security group attached to the servers or containers running the applications must have a rule that allows traffic on port 443 from the CIDR block of the logging account VPC
2) The route table of the VPC in the client accounts must have a route with the logging account VPC CIDR as destination and peering connection as target
3) The security group attached to the OpenSearch instance must allow traffic on port 443 from CIDR ranges of client account VPCs
4) The route table of the VPC in the logging account must have routes with the client account VPC CIDRs are destination and peering connection as target
How do the applications send logs to the ELK instance?
Most applications that send logs are Scala Play applications – they use Logback framework for logging, and the logback.xml file with configuration. We have an appender section for ELK logs – we add it to all applications that send their logs to ELK, thereby ensuring that log entries are the same regardless of the system and have the same fields:
 <appender name="ELK" class="com.internetitem.logback.elasticsearch.ElasticsearchAppender">
    <url>${elkEndpoint}/_bulk</url>
    <!-- This nested %replace expression takes the first letter of the level and maps D and T
    (for DEBUG and TRACE) to d and maps other levels to i -->
    <index>someClient-${environment}-someApp-logs-%replace(%replace(%.-1level){'[DT]', 'd'}){'[A-Z]', 'i'}-%date{yyyy-MM-dd}</index>
    <type>log</type>
    <loggerName>es-logger</loggerName>
    <errorsToStderr>false</errorsToStderr>
    <includeMdc>true</includeMdc>
    <maxMessageSize>4096</maxMessageSize>
    <properties>
      <property>
        <name>client</name>
        <value>iclr</value>
      </property>
      <property>
        <name>service</name>
        <value>ingestion</value>
      </property>
      <property>
        <name>host</name>
        <value>${HOSTNAME}</value>
        <allowEmpty>false</allowEmpty>
      </property>
      <property>
        <name>severity</name>
        <value>%level</value>
      </property>
      ...
  </appender>
Here, environment, elkEndpoint and HOSTNAME are environment variables. environment and elkEndpoint are injected in the EC2 launch template and are populated when the instances are being started.
YOu can also see the <index> element. This will create a new index every day. Before we start sending application logs to ELK, we create an index pattern for each application. An index pattern allows you to select data and can include one or more indices. For example, if we have an index pattern someClient-live-someApp-logs-d-*, it would include indices someClient-live-someApp-logs-d-2023-02-27 , someClient-live-someApp-logs-d-2023-03-13, someClient-live-someApp-logs-d-2023-03-14 and so on.
How do you know if there is a problem with logs?
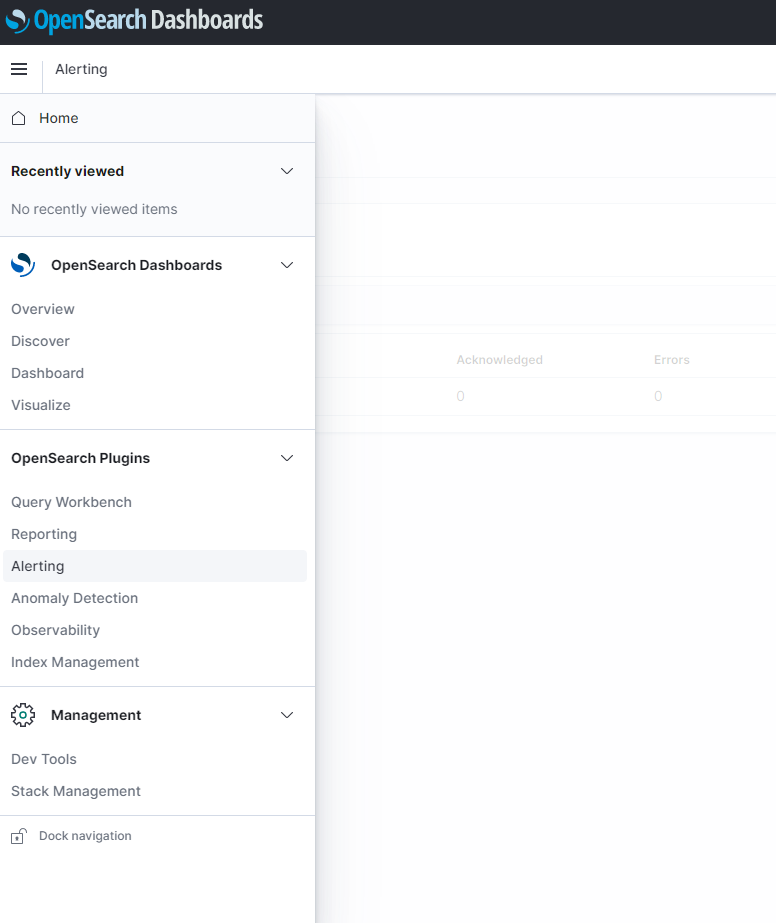
We have monitors set up in Kibana which check that there are logs coming in. This check is run every 10 minutes on each index pattern, and if it doesn’t find any log entries, it sends an alert to an SNS topic which in turn sends an email to inform us that there is a problem. The configuration of alarms and monitors can be done from the OpenSearch Plugins menu of Kibana.
At the moment these monitors are created manually for each index pattern, which is not ideal because it does take a bit of time setting them up; therefore one of the tasks on our to-do list is to automate monitor creation.
How do you make sure that the OpenSearch instance always has enough space?
When each new index pattern is created, we apply a lifecycle policy to it. For example, we delete info logs after a week; when the index agent is 7 days old, it starts to transition into the Delete state. We also have a Cloudwatch alarm which monitors FreeStorageSpace metric in the AWS/ES namespace.
How do YOU centralize logs from multiple systems on AWS? 🙂
When Cloud services are used in an application, it might be tricky to mock them during local development. Some approaches include: 1) doing nothing thus letting your application fail when it makes a call to a Cloud service; 2) creating sets of fake data to return from calls to AWS S3, for example; 3) using an account in the Cloud for development purposes. A nice in-between solution is using Localstack, a Cloud service emulator. Whereas the number of services available and the functionality might be a bit limited compared to the real AWS environment, it works rather well for our team.
This article will describe how to set it up for local development in Docker.
Docker-compose setup:
In the services section of our docker-compose.yml we have Localstack container definition:
Although we don’t need to connect to any AWS account, we do need dummy AWS variables (with any value). We specify which services we want to run using Localstack – in this case it’s SQS and S3.
We also need to set HOSTNAME_EXTERNAL because SQS API needs the container to be aware of the hostname that it can be accessed on.
Another point is that that we cannot use the entrypoint definition because Localstack has a directory docker-entrypoint-initaws.d from where shell scripts are run when the container starts up. That’s why we’re mapping the container volume to a folder wherer those scripts are. In our case create_localstack_resources.sh will create all the necessary S3 buckets and the SQS queue:
EXPECTED_BUCKETS=("bucket1" "bucket2" "bucket3")
EXISTING_BUCKETS=$(aws --endpoint-url=http://localhost:4566 s3 ls --output text)

echo "creating buckets"
for BUCKET in "${EXPECTED_BUCKETS[@]}"
do
  echo $BUCKET
  if [[ $EXISTING_BUCKETS != *"$BUCKET"* ]]; then
    aws --endpoint-url=http://localhost:4566 s3 mb s3://$BUCKET
  fi
done

echo "creating queue"
if [[ $EXISTING_QUEUE != *"$EXPECTED_QUEUE"* ]]; then
    aws --endpoint-url=http://localhost:4566 sqs create-queue --queue-name my-queue\
    --attributes '{
      "RedrivePolicy": "{\"deadLetterTargetArn\":\"arn:aws:sqs:eu-central-1:000000000000:my-dead-letter-queue\",\"maxReceiveCount\":\"3\"}",
      "VisibilityTimeout": "120"
    }'
fi
Note that AWS CLI command syntax is different to the real AWS CLI (otherwise you’d create resources in the account for which you have the credentials set up!), and includes Localstack endoint flag: –endpoint-url=http://localhost:4566
Configuration files
We use Scala with Play framework for this particular application, and therefore have .conf files. In local.conf file we have the following:
The real application.conf file has resource names injected at the instance startup. They live in an autoscaling group launch template where they are created by Terraform (out of scope of this post).
Initializing SQS client based on the environment
The example here is for creating an SQS client. Below are snippets most relevant to the topic.
In order to initialize the SQS Service so that it can be injected into other services we can do this:
lazy val awsSqsService: QueueService = createsSqsServiceFromConfig()
In createsSqsServiceFromConfig we check if the configuration has a Localstack endpoint and if so, we build LocalStack client:
protected def createsSqsServiceFromConfig(): QueueService = {
  readSqsClientConfig().map { config =>
  val sqsClient: SqsClient = config.localstackEndpoint match {
    case Some(endpoint) => new LocalStackSqsClient(endpoint, config.region)
    case None => new AwsSqsClient(config.region)
  }
  new SqsQueueService(config.queueName, sqsClient)
 }.getOrElse(fakeAwsSqsService)
}
readSqsClientConfig is used to get configuration values from .conf files:
private def readSqsClientConfig = {
   val sqsName = config.get[String]("aws.sqs.my_queue")
   val sqsRegion = config.get[String]("aws.region")
   val localStackEndpoint = config.getOptional[String]("aws.localstack.endpoint")
   SqsClientConfig(sqsName, sqsRegion, localStackEndpoint)
}
Finally LocalStackSqsClient initialization looks like this:
class LocalStackSqsClient(endpoint: String, region:String) extends SqsClient with Logging { private val sqsEndpoint = new EndpointConfiguration(endpoint, region) private val awsCreds = new BasicAWSCredentials("test", "test") private lazy val sqsClientBuilder = AmazonSQSClientBuilder.standard() .withEndpointConfiguration(sqsEndpoint) .withCredentials(new AWSStaticCredentialsProvider(awsCreds)) private lazy val client = sqsClientBuilder.build()
Notice that we need fake BasicAWSCredentials that allows us to pass in dummy AWS access key and secret keyand then we use AWSStaticCredentialsProvider, an implementation of AWSCredentialsProvider that just wraps static AWSCredentials. When real AWS environment is used, instead of AWSStaticCredentialsProvider we use DefaultAWSCredentialsProviderChain, which picks the EC2 Instance Role if it’s unable to find credentials by any other methods.
(Or a fun way to introduce local kids to programming)
A previous employer encouraged me to join the STEM Ambassador program at the end of 2017 (https://www.stem.org.uk/stem-ambassadors) and I willingly joined, wanting to give something back to society. The focus of the program is to send ambassadors into schools and local communities, to act as role models and to demonstrate to young people the benefits and rewards that studying STEM subjects can bring. I approached my local primary school (at the time my daughter was a pupil there) about the possibility of setting up an after-school computing club, and they jumped at the chance.
I started the club unsure what to expect, but with a lot of hope and some amount of trepidation. I took on groups of 10 or so KS2 pupils, teaching them the basics of loops, events, variables and functions, largely using Scratch (https://scratch.mit.edu/) and an eclectic mix of programmable robots that I’d acquired over the years (I have a few from Wonder Workshop https://www.makewonder.com/robots/ and also a pair of Lego Boost robots https://www.lego.com/en-gb/product/boost-creative-toolbox-17101). Running the club was extremely rewarding. Some of the kids were brilliant, and will no doubt have a great future ahead of them. Others mainly wanted only to drive the robots around – but I figured that as long as they were having fun then their and my time was well spent.
Then, in March 2020, the Covid-19 pandemic hit. Kids were sent home for months, and all clubs were cancelled, with no knowing when they might start up again. The pandemic has obviously been tough for everyone, but one of the hidden effects has been the impact on the education of our children. It will take years, probably, to know exactly what effect two years of lockdown has had on the attainment opportunities and mental heath of young people. Many of them missed out not only on in-person schooling, but also on all the additional extra-curricular opportunities like school visits, and also things like the STEM Ambassador program.
So now, two years and a change of jobs later, I thought it was about time I got myself back in the field, and start up my STEM activities again.
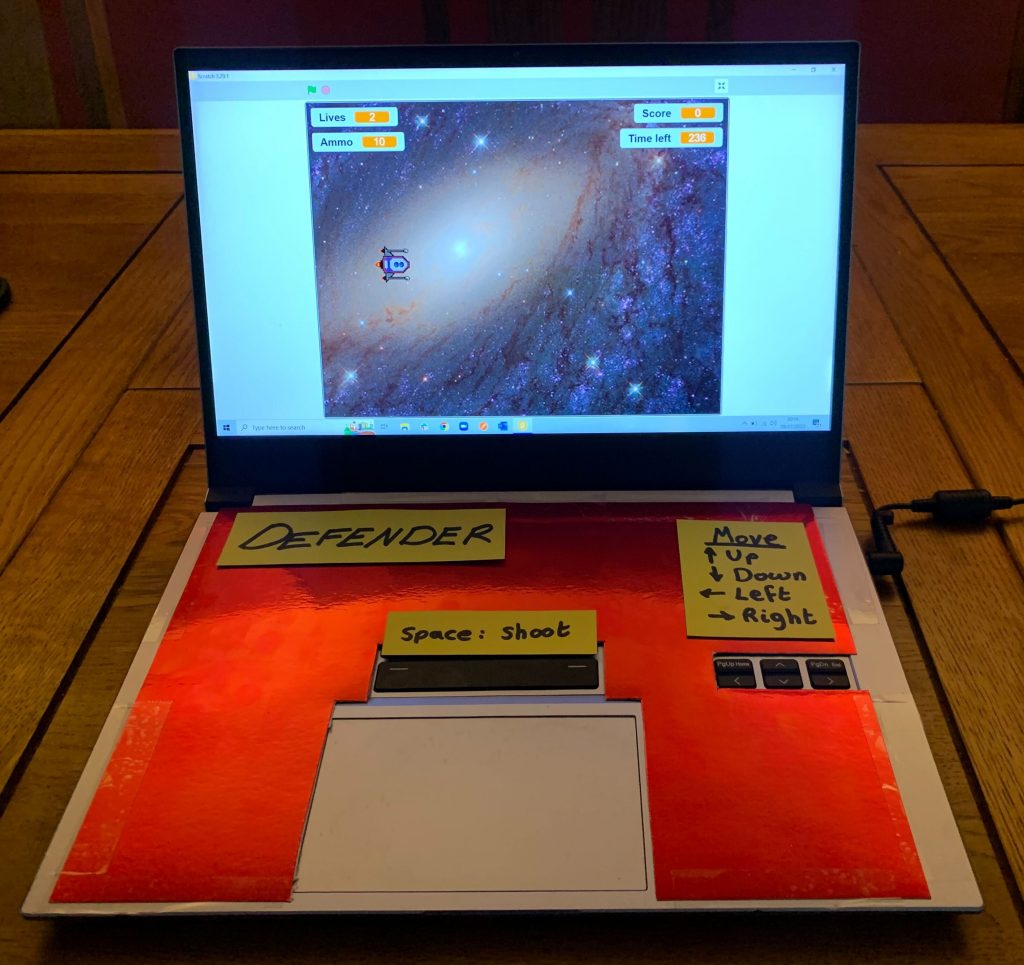
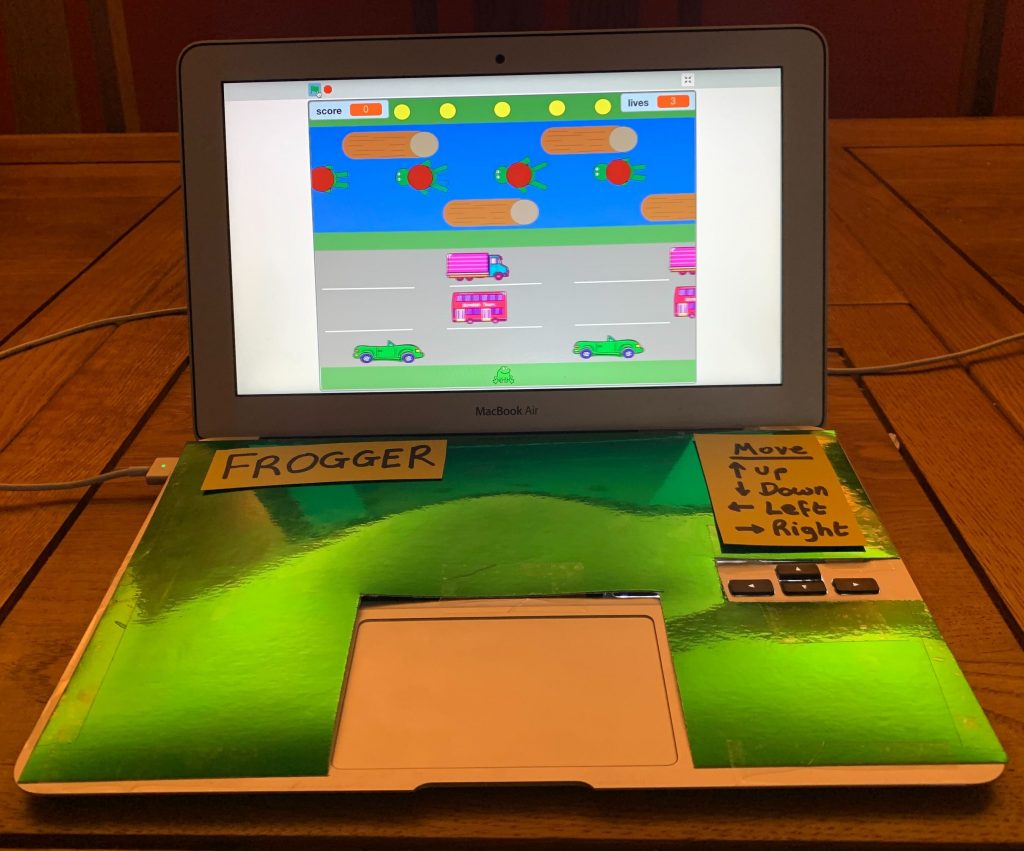
My first opportunity has been to run a “retro games arcade” stall at the school’s summer fair. This involved commandeering a tiny wooden cabin plonked the wrong-way-round on the edge of the school field, next to one of the temporary classrooms. To turn this into a games arcade I needed to black out the windows to make it dark enough inside to see a computer screen, then to run an extension lead out of the window of the classroom, and to quietly steal a few chairs and tables upon which to set up my “arcade consoles”. Blacking out the windows was achieved by covering them up with garden underlay and sticking drawing pins around the edges (much to the detriment of my poor thumbs).
The field and cabin in which I did my STEM Ambassadoring, with the (mostly willing) assistance of my daughter
For the arcade machines, I wrote two games in Scratch based around the classic arcade games “Defender” and “Frogger”. I set up two laptops to run these games, covering over all but the arrow keys, trackpad and spacebar with shiny card. My aim was to write games that the students could replicate themselves, if they wished. I wanted games simple enough that a small child could play, but would also be fun for an older child or a parent to play as well. The gameplay should ideally last for 1-4 minutes, and the player should be able to accumulate a high score. As the afternoon progressed I kept track of the highest two scores in each game so that the players with these scores could win a prize at the end of the afternoon.
If you’re interested in seeing these games then you can have a look here:
The two “retro arcade games” I ran at the summer fair.
Of course the afternoon in question was one of the hottest days of the year. I spent 3 hours diving into and out of the tiny sweltering cabin, caught between managing the queue, taking the 50p fee, handing out Pokémon cards to the players (I got a stack of them and gave one out to every player), explaining to the kids how to play the games, and keeping track of the ever-changing high scores. I did have willing help from my daughter (who especially liked taking the money) and my husband (who seemed adept at managing the queue). At some point I managed to eat a burger and grab a drink, but it was a pretty frenetic afternoon.
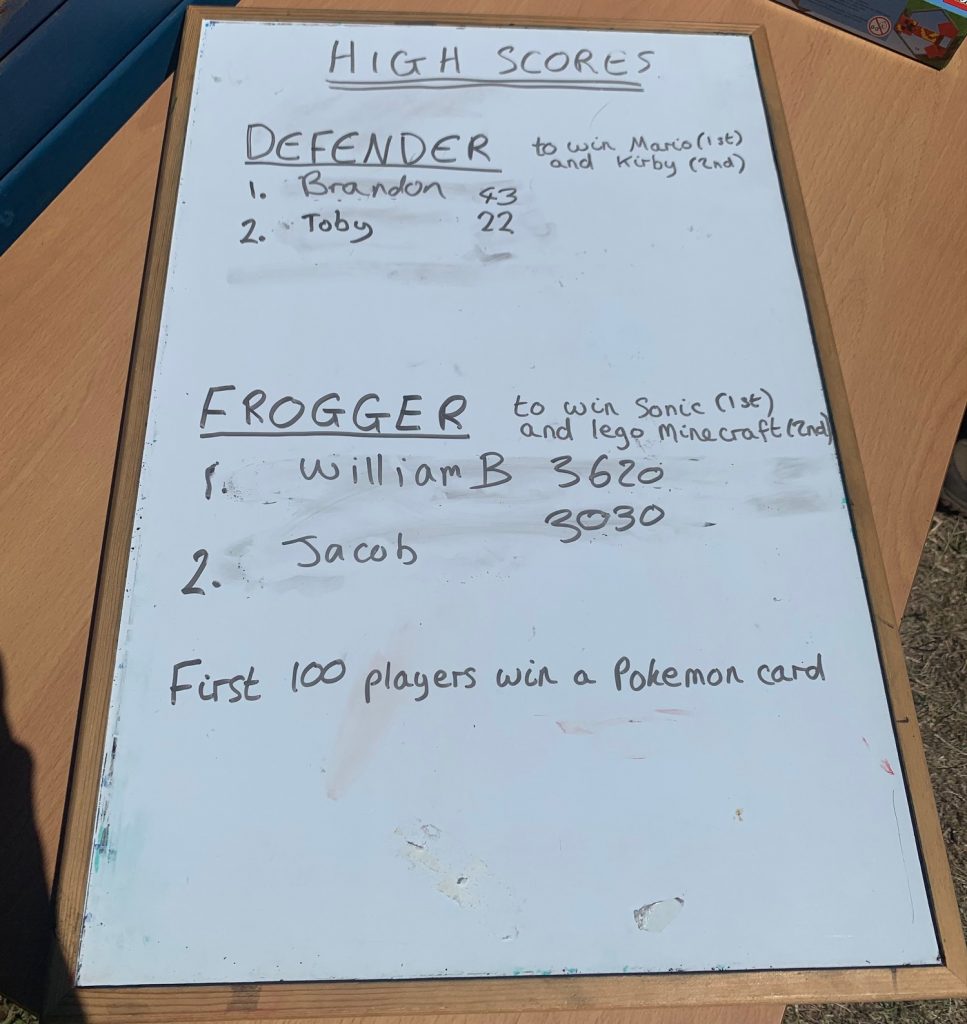
67 Bricks agreed to give me £50 to pay for prizes. I bought Sonic and Mario soft toys, a Lego Minecraft set, and a large pack of assorted Pokémon cards. I also washed up a Kirby soft toy that I found in my daughter’s “charity shop” pile and added that to the prize pool. Throughout the afternoon I kept track of the top two highest scores in both games, using the incredibly high-tech method of a white-board and dry-wipe marker. The hardest part was figuring out how to spell everyone’s name, and in moving the first-place score to second place every time a high-score was beaten. Oh, and making sure the overly-enthusiastic children didn’t wander off with poor Mario before the official prize giving ceremony.
My high-tech leader board, and some of the prizes on offer for the high scores.
As the afternoon progressed I encountered some kids who aced the games, and actively competed with each other to keep their place at the top of the leader board. Other children struggled to control the game and I had to give them a helping hand (quite literally – I said I would control the cursor keys while they controlled the space bar). And then there was the dad who was determined to win a prize for his child, and kept returning to make sure of his position on the leader board. But eventually the last burger was eaten, the arcade was closed, and the prizes announced. Four children went home happily clutching their prizes and the rest their collection of assorted Pokémon cards.
For the next step in my STEM Ambassador journey, I have agreed to start up the computing club again in September. I’m hoping to teach the children the skills to write their own arcade games in Scratch. Watch this space.
When I joined 67 Bricks in January 2021 I knew close to zero about AWS, and not-a-lot about cloud services in general. I had dabbled a bit in Azure in my previous job, and I understood the fundamentals of what “the cloud” was, but I was very aware that I’d have to get up to speed if I wanted to be useful at developing applications on AWS. I joined our team on the EIU project, and on day one I was exposed to discussions about S3 buckets, lambda functions, glue jobs and SNS topics – all things I knew nothing about.
I asked one of the EIU enablement team to give me an overview, and I was introduced to the AWS console and shown some of the key services. Over the next few months I gradually started to get to grips with the basics – I learned how to upload to and download objects from S3, write to and query a DynamoDB table, and search for things in CloudWatch. I was very proud when I wrote my first lambda function, but I still felt like I was winging it.
I was encouraged by our development manager to look into obtaining some AWS certifications. The obvious starting point was Cloud Practitioner (https://aws.amazon.com/certification/certified-cloud-practitioner/?ch=sec&sec=rmg&d=1) which covers the basics of what “the cloud” is, and the applications of core AWS services. The best course I found to prepare for this was one from Amazon themselves https://explore.skillbuilder.aws/learn/course/134/aws-cloud-practitioner-essentials (you might need to sign in to the skill builder to access it, but the course is free). It uses the analogy of a coffee shop to explain the concepts of instances, scaling, load balancing, messaging and queueing, storage, networking etc, in an easy to understand manner. After a lot of procrastinating, and wondering if I was ready, I eventually took the exam in October 2021 and passed it with a respectable score.
The cloud practitioner course covers AWS services in an abstract manner – you learn about the core services without ever having to use them. In fact you could probably pass the course without ever logging into the AWS console. To demonstrate real experience and knowledge of AWS services, I decided that the certification to go for next was Developer Associate (https://aws.amazon.com/certification/certified-developer-associate/?ch=sec&sec=rmg&d=1). AWS doesn’t offer their own course to study for this certification – instead they provide links to numerous white papers, which make for fairly dry reading, and it is not clear exactly what knowledge is and is not required.
After doing a bit of research I decided that this course on Udemy https://www.udemy.com/course/aws-certified-developer-associate-dva-c01/ by Stephane Maarek was the most highly rated. With 32 hours of videos to absorb, this was not a trivial undertaking, but after slotting in a few hours of study either before work or in the evenings, I made it through with two books stuffed with notes.
The Developer Associate certification requires you to understand at a fairly deep level how the AWS compute, data, storage, messaging, monitoring and deployment services work, and also to understand architectural best practices, the AWS shared responsibility model, and application lifecycle management. A typical exam question for Developer Associate might ask you to calculate how many read-capacity-units or write-capacity-units a DynamoDB table consumes under various circumstances. Another one might test your understanding of how many EC2 instances a particular auto-scaling policy would add or remove. Another question might require you to understand what lambda concurrency limits are for.
But what next? The knowledge I’d gained up until this point had given me real practical skills, and a deeper knowledge of how the various AWS services connect together. For example, it was no longer a mystery how lambda functions could be triggered by SNS topics or messages from an SQS queue, and could then call another API perhaps hosted on EC2 to initiate some other process. And I could understand how to utilise infrastructure-as-code (e.g. CloudFormation or CDK) along with services like CodePipeline and CodeDeploy, to automate build processes. But I wanted a greater understanding of the “bigger picture”, and so next I chose to go for the Solutions Architect Associate certification (https://aws.amazon.com/certification/certified-solutions-architect-associate/?ch=sec&sec=rmg&d=1).
The Solutions Architect Associate exam typically presents a scenario and then asks you to choose which option provides the best solution. One option is usually wrong, but there could be more than one solution which would work – but you have to scrutinise the question to see which one best meets the requirements of the scenario. Are they asking for the cheapest solution? Or the fastest? Or the most fault tolerant? (Look for clues like “must be highly available” – and so the correct answer will probably involve multi-AZ deployments). Is any down-time acceptable? Is data required in real time, or is a delay acceptable? (E.g. do we choose Kinesis or SQS?) If a customer is migrating to the cloud are there time constraints, and how much data is there to migrate? (E.g. it can take a month or two to set up a Direct Connect connection, but you could have a Snowmobile in a week. A VPN might work but there are limits to the data transfer rates).
Again, I chose Stephane Maarek’s course on Udemy (https://www.udemy.com/course/aws-certified-solutions-architect-associate-saa-c02/) – his study materials are clear and he also notes which sections are duplicates of those in the developer associate course. I again used Jon Bonzo’s practice exams (https://www.udemy.com/course/aws-certified-solutions-architect-associate-amazon-practice-exams-saa-c03/). There is a fairly hard-core section on VPC, which is something I struggled with. Stephane presents a spaghetti-like diagram showing the relationship between VPCs, public and private subnets, internet gateways, NAT gateways, security groups, route tables, on-premise set-ups, VPC endpoints, transit gateways, direct connections, VPC peering connections etc – and says “by the end of this section you’ll know what all of this means”. He was right, but as someone with limited networking experience and knowledge, I found it pretty tough.
I sat the exam in April 2022, a day before I figured out that the cough and fatigue I’d developed was actually Covid. I passed the exam respectably again, and then collapsed into bed for a few days to recover.
At this point it’s probably worth mentioning how the exam process works. If you like, you can book an exam in an approved test centre. However, I chose to go with the “online proctored” exams hosted by Pearson Vue. You book an exam slot – generally plenty are available at all times of the day and night, and you can usually find a slot within the next day or two that suits. For the exam you need to be sitting at a clear table with nothing within arms reach. Not even a tissue or a glass of water. You need to run some Pearson software on your laptop that checks no other processes are running (so turn off slack, email, shut down your docker containers etc etc), and then launches their exam platform. You will be asked to present photo ID, and then show the proctor your testing environment. They will want to see your chair and table from all angles, and will want to see your arms to make sure you’re not wearing a watch or have anything hiding up your sleeves. You need your mobile phone in the room, but out of reach, in case they need to call you. And you also need to make sure you are undisturbed in the room for the duration of the exam (which is typically 2-3 hours).
This last point was challenging for me. My home-office is not suitable – being far to crammed with potential cheat material, and I also share it with my husband. The only suitable place is my dining table, in the very open-plan ground floor of my house. Finding a time when I can have the ground-floor to myself for 2-3 hours means scheduling the exam for around 7AM in the morning on a day when the kids are not at school. I ended up putting “do not disturb” signs on the door and issuing dire warnings to everyone that they mustn’t come downstairs until I’d given them the all-clear. Anyone wandering sleepily through the room on a quest for coffee could result in the exam proctor dropping my connection and disqualifying me from the exam. Fortunately, all was well and all the exams I’ve sat so far were carried out without incident.
After obtaining the Solutions Architect Associate certification I thought about taking a break. But then I took a look at the requirements for SysOps Administrator Associate (https://aws.amazon.com/certification/certified-sysops-admin-associate/?ch=sec&sec=rmg&d=1) and realised that I’d already covered about two-thirds of the required material. Now SysOps is not something I have a love for. I have a deep respect for people who understand deployments and pipelines and infrastructure. The Enablement team at the EIU, who I work closely with, are miracle workers who regularly perform magic to get things up and running. The idea that I could learn some of that wizardry seemed far-fetched. But I thought I might as well give it a go.
The SysOps certificate focusses a lot on configuration and monitoring. You learn a lot about load balancers, autoscaling policies, CloudFormation and CloudWatch. And yes, all that indepth knowledge about VPCs and hybrid-cloud set-ups is applicable here too. A typical exam question will present a scenario where something has gone wrong, and you have to pick the best option to fix it. For example, someone can’t SSH into an EC2 instance because something is wrong with the security group. Or someone in a child account of a parent organisation can’t access something in another child account. Yet again I went to Stephane Maarek’s course, which was again excellent (https://www.udemy.com/course/ultimate-aws-certified-sysops-administrator-associate/). And Jon Bonzo again provided the practice exams (https://www.udemy.com/course/aws-certified-sysops-administrator-associate-practice-exams-soa-c01/).
I sat the SysOps exam in June 2022. One thing that caused a little trepidation was that this exam includes “exam labs” – these are practical exercises carried out in the AWS console. It was hard to prepare for these because I could not find any practice labs on-line, and so I was going in cold. However, it turned out that the labs were well defined with clear steps on what was required. Even the ones where I had never really looked at the service before, I was able to find it in the console and figure out what I needed to do. I was asked to:
Create a backup plan for an EFS system with two types of retention policy
Update a CloudFormation stack to fiddle with some EC2 settings, roles, route tables etc
Create an S3 static website and configure some Route 53 failover policies
The second of these caused me the most difficulty – I hadn’t anticipated actually having to write a CloudFormation template – they provided one which I needed to edit and it took me a while to figure out how to actually do this. Turns out that you need to save a new version of the template locally and then re-upload it.
I passed the SysOps exam with a more modest mark than for the other certifications, and I definitely breathed a sigh of relief. I am now definitely taking a breather – perhaps in a few months I might take a look at some of the specialist certifications (maybe Data Analytics?) but for the moment I’m going to get back to some of my other neglected hobbies (I like to draw, and play the piano, and one day I’ll maybe finish my epic fantasy trilogy).
The key take-aways from my experience are:
The associate level certifications require you to acquire knowledge that is directly applicable in the day-to-day life of a developer or systems administrator.
I was initially concerned that the courses would be part of a propaganda machine from AWS, encouraging us to spend ever larger amounts on AWS services. I found this to not be the case at all. Quite a large part of the material teaches us how to save costs, and how to incorporate our existing on-premises infrastructure with AWS, rather than replacing it entirely.
Sitting an exam in your own home is definitely preferable than travelling to a test centre – you get far more flexibility over when you can take the exam. However, not everyone will have a suitable place at home to take the exam, particularly if you share your home with other people, or you do not have a suitable table to work at.
Studying for these certifications will require a significant time commitment. The online courses run for 20-30 hours or more, assuming you never pause the videos to take notes, or repeat a section. And that is before you take time to revise or do practice exams.
Definitely the most valuable tool for preparing for the exams is by completing as many practice exams as you can find. The best ones include detailed explanations about why a particular answer is correct and the others are wrong.
Also note that these certifications have an expiry date – typically 3 years – and also the courses are refreshed periodically. For example, the Solutions Architect Associate is being refreshed at the end of August and Solutions Architect Professional is being refreshed in November.
As discussed in the previous post on Sharing Failures, seeing how other people have dealt with bugs and errors can often help you avoid your own or give you ways to track down the source of a problem when one does make its appearance. So in that spirit, here is the story of a baffling error we fixed recently.
The error came from a content delivery platform we have been working on for a publisher client. At the point of a release and for several hours after we were seeing some errors, but there were a few reasons why this was very confusing.
The site is built using Scala / Play and uses Akka HTTP to make API calls between services. The error we were seeing was one that generally means that requests are coming in to a frontend service faster than the backend can service them:
BufferOverflowException: Exceeded configured max-open-requests value of [256]. This means that the request queue of this pool (........) has completely filled up because the pool currently does not process requests fast enough to handle the incoming request load. Please retry the request later. See https://doc.akka.io/docs/akka-http/current/scala/http/client-side/pool-overflow.html for more information.]]
So apparently the pool of requests was filling up and causing a problem. But the first thing that was strange was that this was persisting for several hours after the release. At the point of a release it’s understandable that this error could occur with various services being started and stopped, causing requests to back up. After that the system was not under particularly high load, so why was this not just a transient issue?
The next thing that was strange was that we were only seeing this when users were accessing very particular content. We were only seeing it for access to content in reference works. These are what publishers confusingly call “databases” and cover things like encyclopedias, directories or dictionaries. But it wasn’t all databases, only certain ones and different ones at different times. On one occasion we would see a stream of errors for Encyclopedia A and then the next time we hit this error it would be Dictionary B generating the problems instead. If the cause was a pool of requests filling up, why would it affect particular pieces of content and not others, when they all use the same APIs?
Another thing that was puzzling – not every access to that database would generate an error. We’d either get an error or the content would be rendered fine, both very quickly. The error we were seeing suggested that things were running slowly somewhere, but the site seemed to be snappy, just producing intermittent errors for some content some of the time.
We spent lots of time reading Akka HTTP documentation trying to figure out how we could be seeing these problems, but it didn’t seem to make any sense. I had the feeling that I was missing something because the error seemed to be “impossible”. I even commented to a colleague that it felt like once we worked out what was going on I would talk about it at one of our dev forums. That prediction turned out to be true. Looking at Akka HTTP documentation would not help because the error message itself was in some sense a misdirection.
The lightbulb moment came when I spotted this code in our frontend code:
private lazy val databaseNameCache: LoadingCache[String, Future[DatabaseIdAndName]] =
    CacheBuilder.newBuilder().refreshAfterWrite(4, TimeUnit.HOURS).....
We are using Guava’s LoadingCache to cache the mapping between the id of a database and its name since this almost never changes. (Sidenote: Guava’s cache support is great, also check out the Caffeine library inspired by it). The problem here is that we are not storing a DatabaseIdAndName object in the cache, but a Future. So we are in some sense putting the operation to fetch the database name into the cache. If that fails with an Exception, then every time we look in the cache for it we will replay the exception. Suddenly all the pieces fell into place. A transient error looking up a database name at release time was being put in a cache on one frontend server and replayed for hours. The whole akka pool thing was more or less irrelevant.
In the short term we fixed the problem by waiting for the concrete data to be returned to store that in the cache rather than a Future object. In that scenario, a failure to fetch the value would just yield an error and nothing would be cached for future look ups. However, much of the code using this cache is asynchronous, so it’s cleaner and probably better from a performance perspective if you can continue to use Future where possible. So the longer term solution was to revert to putting Future objects in the cache but carefully adding code to invalidate any cache entries that resolve to an exception.
I think the lesson here is – if an error doesn’t make sense then maybe some technical sleight-of-hand is going on and the error you are seeing is not the real problem. Maybe it’s all an illusion…
In the dev meeting today, we talked about debugging XQuery.
XQuery is a query language (primarily) for XML (in very loose terms, it’s like SQL for XML). Reece is the developer of an IntelliJ IDEA plugin that supports development of XQuery in IDEA. The latest changes he’s made to it allow it to be used for debugging XQuery in MarkLogic.
In IDEA, after installing his plugin, you need to set up an XQuery Run/Debug configuration for the MarkLogic server you are debugging. Then, you can run an XQuery file from within IDEA against MarkLogic, and it will display the output in the MarkLogic console.
Using standard IDEA breakpoints, you can add a breakpoint to an XQuery expression. Then, you can debug, which shows the stack frame, and the current variables and their values.
There is some complexity in working out the stack frames for eval expressions, which dynamically execute XQuery code in strings. Inigo expressed the opinion that this was generally a bad idea anyway.
At the moment, it’s not possible to debug into X-Ray XQuery tests, but Reece is doing further work to make it possible to run X-Ray tests easily from IDEA, which would also include work to make X-Ray tests debuggable.
Reece is also working on debug support for Saxon, which will support debugging in XQuery and in XSLT via Saxon.
Alex talked about Clarity, a language for running on the Blockstack blockchain. He recently worked on a hackathon for it. One of the motivations was to improve his functional programming – Clarity is very Lisp-like, and so being forced into a functional mindset was useful for learning. Another motivation was that Clarity were offering cash prizes. Clarity is pretty new – and things like the test framework and code syntax highlighting are very new.
Alex wrote a high score system that runs in Clarity – that will maintain the high scores for a game long-term, rather than needing to be maintained by a particular game developer on their own server.
There are various limitations to Clarity because of the nature of running on the blockchain – like an inability to perform loops, because it’s not possible to prove that they resolve in a reasonable length of time, due to the halting problem. And some primitives cost money, like storing and retrieving variables in the blockchain.
There is a built-in testing framework, that allows you to test your code on your local machine without writing to the blockchain. It’s incomplete at the moment, because it does not support transactions.
Native lists cannot be unbounded, for similar reasons of cost. So Alex also wrote an “endless list” that is essentially a linked list of bounded lists, so you can treat it as an unbounded list but you are only acting on the portions of list that you are currently looking at.
He then wrote code that can be used for redistributing money from a group of donors to a large group without having to use existing infrastructure like Paypal – because organizations like Paypal don’t like it when individuals send money to lots of people. This was inspired by some work that was done based on US stimulus cheques – individuals got cheques from the government, but not all of them needed them, and plenty of people needed more than the stimulus cheque provided. This allowed a group of donors to store money in the contract itself, in a way that is transparent to everyone; and then it to be distributed out to a set of recipients.
Reece talked about the latest improvements to his IntelliJ IDEA XQuery plugin. It now shows inline parameter names on function calls, and shows the function structure. It also displays documentation for functions from MarkLogic or from the standard XQuery and XPath libraries – it will download the documentation.
It will also show a query log in a tab for the various MarkLogic log files, so you can see the latest log messages without viewing a separate file. This works for both local log files, and for remote MarkLogic servers.
It will parse MarkLogic rewriter XML files, and display the results as a list of REST endpoints. In the upcoming version, it will automatically retrieve all the registered MarkLogic schemas, so for the rewriter.xml it provides auto-complete for the various structural elements and options in the rewriter XML. It also parses RestXQ APIs as used in systems like BaseX.
It will handle relative imports correctly if you set an XQuery directory as a source root – so “/myLibraries/whatever.xqy” will resolve to the right place. In the upcoming version, it will be able to recognize these automatically.
When you’re executing queries locally using a configured query processor (e.g. if you’ve configured MarkLogic or another system so you can do the local equivalent of using the MarkLogic console), then you can pretty-print the output and you can also see profiling information for the code that you execute.
Reece is currently working on debug support, so you can set breakpoints in your XQuery code.
Inigo stated that Reece’s plugin is great, and that everyone using XQuery or MarkLogic should be using it.
Chris talked about a taxonomy management service that we’d created for a publisher. We created a system that allowed for a large number of taxonomies to be stored and updated, so they could be used by the client for categorizing their content. When a new version of a taxonomy arrived (for example a medical taxonomy like SNOMED-CT), then it would be stored inside the data store. We would often want to provide a subset of that taxonomy, because the ontologies were too large and sprawling to be useful to individual consumers.
Rich talked about SNOMED-CT; which is an ontology of medical terms. It describes tools, procedures, drugs, devices and many other things. It’s important that two different medical systems use the same terms for what they’re referring to, like “paracetamol”. By using the same identifier from SNOMED-CT for each, then it makes it easier to correlate the data between different systems.
Reece talked about a project for a customer that uses a financial ontology to manage financial documents. Those documents discuss a range of financial topics – so the system we developed uses the ontology to classify the sections within the document according to the terms matching those sections. Hence – the customer can find documents and sections within them that are relevant to the specific
We briefly discussed the differences between term lists, taxonomies, thesauri, and ontologies. Inigo expressed the heretical view that none of the definitions really matter.
We sometimes care about classifying content against geographical regions, and understanding the hierarchy of those regions. For example, we might classify a document as discussing a legal case based in Paris. However, the user is interested in legal cases of that sort occurring in the EU. Because our ontology provides information that Paris is in France, and that France is in the EU, then we should be able to provide that information to the user based on inferring this additional information for the document. Loic talked about this, and also about the need to make subsets of ontologies to a certain depth only – we don’t necessarily care about small villages, and may harm performance as well as providing false positives.
Nikolay talked about micro-frontends – a frontend composed of UIs provided from different servers. He talked about using view components in ASP.NET Core MVC, and how they allow you to compose the information displayed in a view in a slightly different way to using partials. This is done server-side. They retrieve their data via dependency injection – so the parent doesn’t need to change when the contained component changes. It helps you think in terms of features rather than pages.
Alex A talked about the “Astronomy Picture of the Day” – he has liked having this as his desktop background. But getting hold of all the images is hard – there’s an torrent but that’s very old, you can download the site via wget but that leads to duplication and an odd file structure. They do have an API via https://api.nasa.gov/planetary/apod (and there are a lot of other NASA APIs) – but the parameters that the API describes don’t actually work! You can retrieve a chunk of JSON for an individual picture at a time – but if you repeatedly call it, then you get banned for too many accesses. It turns out that you can pass in a start_date and an end_date, and get a big chunk of JSON back from it, which resolves the “too many accesses” problem. He parsed this with the Newtonsoft JSON library (very useful for .NET JSON parsing), dealing with a few dirty data issues. One of the problems is that there are some specific dates that don’t work – and if they’re inside your date range, then the whole date range fails! So, Alex wrote code to bisect the date range repeatedly to find what the problematic date was so it could be excluded from the range. There were also some broken images in the data. Alex has now downloaded all of these files, organized them by size, and put them in a torrent, so they are now freely available.
Alex G talked about Powershell, and how he uses it. It uses an object-oriented scripting language, based on .NET (or .NET core for Powershell Core), and also has ksh-style syntax. It supports basic calculation on the command-line like addition and multiplication – and can do more complex maths with e.g. [Math]::Exp(2) – and it will autocomplete from within .NET packages too. It supports setting up aliases. “ogv” (Out-GridView) is a useful graphical tool for filtering text… but it only works on Windows. Because it’s acting on objects and passing objects between components, you can act on them as objects – e.g. “ls | select -Property length” will select the “length” property of each filename. “ls | convertto-json” will create a JSON format of the input, and convertfrom-json will conver it back again into a JSON object that can be traversed via JSON dot notation. Powershell Core is available on OS X and on Windows – and if you’re working on a mix of Windows and Unix environments, then it can be useful to use Powershell across each environment.
Inigo talked about Amazon Polly, a speech synthesis tool that we’ve been using for a client. The impressive thing about it is how well it reads out scientific text – while we’ve looked at speech synthesis before, it’s always been good at doing common words but has fallen over with technical text. Polly copes very well.